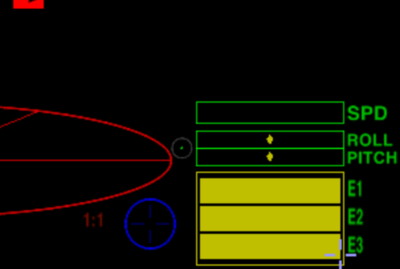
Difference between revisions of "HUD"
Cholmondely (talk | contribs) (Added Joystick Precision Indicator) |
Cholmondely (talk | contribs) (→Discussions: Added another) |
||
| (4 intermediate revisions by 2 users not shown) | |||
| Line 102: | Line 102: | ||
It is also possible to instead use [[Dizzy's guide to Setting up Joystick Axis Profiles|splines]] for your joystick axes. | It is also possible to instead use [[Dizzy's guide to Setting up Joystick Axis Profiles|splines]] for your joystick axes. | ||
| + | |||
| + | Sensitivity was originally introduced in the Linux port for Oolite (2005) and then carried over into the other versions. | ||
[[File:DeeperSpaceHUD.png|thumb|300px|right|(Optional) [[Deeper Space HUD]]]] | [[File:DeeperSpaceHUD.png|thumb|300px|right|(Optional) [[Deeper Space HUD]]]] | ||
[[File:SniperCameraSystemv1.1-3.png|thumb|300px|right|(Optional) [[Sniper Camera System HUD]]]] | [[File:SniperCameraSystemv1.1-3.png|thumb|300px|right|(Optional) [[Sniper Camera System HUD]]]] | ||
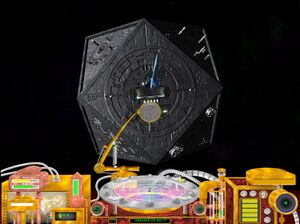
[[File:Steamhud.jpg|thumb|300px|right|(Optional) [[Steampunk HUD]]]] | [[File:Steamhud.jpg|thumb|300px|right|(Optional) [[Steampunk HUD]]]] | ||
| + | |||
== Links == | == Links == | ||
*[[Pilot's Reference Manual]] | *[[Pilot's Reference Manual]] | ||
*[[Oolite Equipment]] | *[[Oolite Equipment]] | ||
| − | *[ | + | *[https://bb.oolite.space/viewtopic.php?f=6&t=1537 Pitch and Roll Indicators] (2006) |
=== Optional HUDs === | === Optional HUDs === | ||
==== Collections ==== | ==== Collections ==== | ||
| Line 123: | Line 126: | ||
==== Discussions ==== | ==== Discussions ==== | ||
| − | *[ | + | *[https://bb.oolite.space/viewtopic.php?t=21679 What do YOU use Roll & Pitch Gauges for?] (2024) |
| − | *[ | + | *[https://bb.oolite.space/viewtopic.php?f=2&t=19000 3d cockpit idea] (2017) |
| − | *[ | + | *[https://bb.oolite.space/viewtopic.php?t=16304 Lasers and cabin temperature] (2014) |
| + | *[https://bb.oolite.space/viewtopic.php?f=2&t=11494 HUD elements: which are essential, delightful, superfluous?] (2012) | ||
| + | *[https://bb.oolite.space/viewtopic.php?f=2&t=8355 HUDs or Cockpits?] BB thread (2010) | ||
| + | *[https://bb.oolite.space/viewtopic.php?f=4&t=5724 The HUD-shop] BB thread (2009-10) | ||
{{NavBox - Oolite Equipment}}[[Category:Equipment]] | {{NavBox - Oolite Equipment}}[[Category:Equipment]] | ||
[[Category:HUDs OXPs| ]] | [[Category:HUDs OXPs| ]] | ||
Latest revision as of 15:06, 29 July 2025
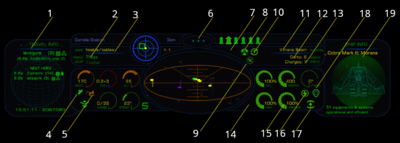
A HUD is a Heads-Up Display: a transparent display that presents data without requiring users to look away from their usual viewpoints. The origin of the name stems from a pilot being able to view information with the head positioned "up" and looking forward, instead of angled down looking at lower instruments. A HUD also has the advantage that the pilot's eyes do not need to refocus to view the outside after looking at the optically nearer instruments First developed in the 1940s for military aircraft (from Wikipedia).
As the newer versions of Oolite have allowed more flexibility with modifying HUD elements since the early days of Oolite v.1.20 in 2004! From the halcyon days of Aegidian's hand-crafted Mega-Walnut dashboard (for the luxurious Fer-de-Lance), the HUD designers have risen to the challenge. There was a quantum leap under Cim's tenure as lead designer, when it was made easier to code new HUDs and the range of possibilities was greatly increased. This extended to MFDs. This happened with the release of Oolite v.1.79 in 2013/4.
The HUD uses holographic litePixel overlay to project essential details onto the main View Screen, allowing the pilot the maximum available information with minimum eye movement.

Contents
- 1 (1) Shield Strength
- 2 (2) Level indicators
- 3 (3) Pylon weapon indicators
- 4 (4) Aegis
- 5 (5) Mass Lock/Status indicator
- 6 (6) Short-range Scanner
- 7 (7) Galactic Standard Time indicator
- 8 (8) Scanner Zoom Factor
- 9 (9) Space Compass
- 10 (10) Relative Speed indicator
- 11 (11) Roll/Pitch indicators
- 12 (12) Energy Level Indicators
- 13 (13) Fuel Scoop Status Indicator
- 14 (14) Joystick Precision (sensitivity) Indicator
- 15 Links
(1) Shield Strength
Shows the effective charge in the twin Zieman deflector shields. These shields absorb energy by reflecting it with an equivalent charge of inverse energy. There are two generators for these shields, one forward and aft.
(2) Level indicators
From top to bottom:
- Witchspace Fuel
Indicates how much Quirium fuel is left in the tanks. Using the Hyperdrive or the Fuel Injectors will decrease the amount of fuel on board. If a hyperjump destination is plotted on the Short Range Chart, a needle will indicate how much of the available fuel will be required. - Cabin Temperature
This scale reports the cabin temperature. This will rise when a ship nears the corona of a star or encounters too much atmospheric friction near the surface of a planet. If the temperature gets too high, the structure of the ship will begin to break down as the plating melts. If this begins to happen, the ship will explode. - Laser Temperature
Although ships do have a laser cooling system on board, coupled with the cooling matrix of each type of laser, rapid firing will still generate more heat than either system is capable of handling. This gauge will report how hot the laser is getting, and if the indicator reaches the top the laser will shut down until it cools. - Altitude
Indicates the height of a ship from a planetary body. The drive matrices in most ships are not usually sensitive enough to deal with atmospheric entry. As a result, ships may suffer catastrophic hull failure when coming into contact with a planet's atmosphere. The altitude meter will indicate when the ship is becoming dangerously close to a planet's surface. If the bar reaches the top, the ship's structural integrity will be compromised.
(3) Pylon weapon indicators
These indicators show the type and status of weapons attached to the external pylons of your ship. There are three types of armament that can be mounted, and these are distinguished by different icons on the HUD:
When shown with a yellow outline, the highlighted weapon is armed and ready to launch.
To arm a missile, hit t on your console. To disarm, press u, or switch back to ID mode by pressing r. To fire, press m.
A Multi-Targeting System may be purchased and installed, to select several simultaneous targets.
For a guide to OXP pylon indicators see Category:Missiles & Bombs
(4) Aegis
When this S is displayed, the ship is within the control zone of a space station, inside its protective Aegis. Any pirate activity detected within this zone will be met by immediate response from members of the Galactic Police.
(5) Mass Lock/Status indicator
This pulsating lamp shows the status of your ship. If it is green, the radar is clear, and the Torus Jump Drive may be activated. If it is yellow, there are other vessels or powered objects in the nearby vicinity, and the Jump Drive is inhibited. If it is red, there is a danger to your ship: a hostile may have target-locked your ship, your energy reserves may be very low, you may be at too low an altitude, or your cabin temperature may be approaching a dangerous level.
(6) Short-range Scanner
The scanner is the pilot’s overview of the world outside, and is a protected design, patented by Brell and Baben in 3084, running the IFF system on a 3D representation of space in a 10 km radius of the ship.
The three dimensions are represented via an elliptical display showing the horizontal plane plus the use of ‘tails’ on each scanner blip to indicate the vertical position in relation to the scanning ship’s position. To make further use of this tool, see 8, Scanner Zoom Factor.
(7) Galactic Standard Time indicator
Displays the current date and time in galactic meanTime, the standard notation for recording time in space. It is used because it does not rely on point of reference like planetary rotations. Upon exiting witchspace, the clock will temporarily enter update mode to synchronise with the local time signal as broadcast by all witchspace beacons. This is necessary due to the small amount of relative time distortion experienced during witchspace transit.
(8) Scanner Zoom Factor
This shows the zoom factor of the scanner, from 1:1 (normal scale) to 1:5 (macro scale). The key marked z on your console will toggle through the zoom factors. Z reverts to normal scale.
(9) Space Compass
There are two space compasses available for your HUD. Your ship is fitted with the basic version. It tracks a single object, intelligently choosing which would be the more relevant. Upon entry to a system it will automatically track the location of the nearby planet.
When the world's space station is detected, the compass will track that instead. The Advanced Space Compass may be purchased to offer further options.
(10) Relative Speed indicator
The speed indicator show s the ship's relative velocity through space using the System drive. Through advanced AI and engineering technology, much of the hard work of space flight has been removed from the pilot and made the speciality of the flight computers on board the ship. This means that a simple relative speed indicator is all that is needed to calculate the ship's speed in relation to the major bodies of the system.
A simple control method will increase and decrease the ship's movement from a standstill to speeds in excess of 0.3 light Mach. Use the w and s controls on your console to increase or decrease your speed respectively.
To further enhance your ship's speed performance, consider installing Witch fuel injectors.
The bar is green between 0 - 25%, yellow between 25 - 80%, and red above 80% of maximum speed.
(11) Roll/Pitch indicators
These scales show the ship's roll rate about the axis of travel (the central dot will move to the right of centre when the ship is rolling clockwise, to the left if counterclockwise), and the thrust levels in the vertical axis (the central dot will move left when in a dive attitude, and right when climbing). These are useful when calibrating directional controls following a systems upgrade or an avionics failure.
(12) Energy Level Indicators
These bars show the amount of energy stored in the solar capacitors. They are used primarily to power the ship's systems, including the structural integrity field, life support system and lasers, as well as auxiliary systems such as cargo loading systems and communications. Ships can have between 2 and 7 capacitors, and energy will drain from them in numerical order as the ship takes damage. Hull damage will reduce these levels as the autoRepair systems seal hull breaches. If the last energy cell is depleted, the hull's damage will cease to be sealed and the structural integrity field will collapse, normally resulting in explosion with the final laser hit.
These cells will recharge using solar energy when the ship is in cruise mode.
An Extra Energy Unit is available for purchase which will improve the recharge rate of the energy cells.
(13) Fuel Scoop Status Indicator
This icon, only visible when Fuel Scoops are fitted, is located between the Forward Shield Strength indicator and the Short-range Scanner on the Cobra Mark III. The Fuel Scoops Status Indicator has the twin function of indicating when the Fuel Scoops are in operation and also when the Cargo Bay is filled to capacity.
(14) Joystick Precision (sensitivity) Indicator
This is the little green dot in the circle between the red scanner and the green roll & pitch indicators.
- If there is no joystick/controller connected, then it will not show up.
- If your joystick is in precision mode this is green.
- If your joystick is not in precision mode it is gray.
The setting for which button controls precision mode will be found in the joystick/controller configuration page (see above).
Note that the function of the precision toggle key for a joystick is not the same as the precision modifier key (ctrl) on the keyboard.
The ctrl key must be kept pressed all the time one wishes precision flight. The Joystick toggle only needs to be pressed once!
Without precision mode, the joystick works in a strictly linear fashion. The further you move the stick, the faster your ship rolls, pitches or yaws, in direct proportion to the distance you move the stick. The biggest problem this presents is that, much of the time, even small movements of the stick from the neutral centre position produce ship movements that are too large for precision control. It is very difficult to accurately line up a shot on a distant target, as even tiny taps of the stick move the sights from one side of the target to the other. Docking is difficult too, as inputting the correct amount of roll (a matter of only a few millimetres of stick movement) is largely a matter of luck... if you are even a fraction of a millimetre out in either direction, ship roll will not match station roll, and you will either take massive damage, or die horribly.
To overcome this, "joystick precision mode" was quickly introduced. When enabled, this reduces stick sensitivity by a factor of three, so that to obtain the same degree of pitch, roll or yaw, you now have to move the stick three times as far. The upshot being that when precision mode is toggled on, much finer control is possible, as small movements of the stick would result in a movement of only 1/3 as much as in normal mode. Naturally, some skill is still required, but manual docking and long-range sniping are now practical possibilities, at least.
It is also possible to instead use splines for your joystick axes.
Sensitivity was originally introduced in the Linux port for Oolite (2005) and then carried over into the other versions.
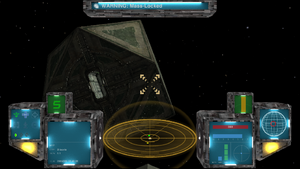
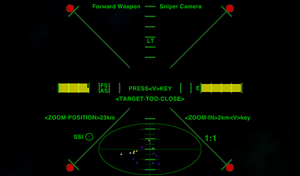
Links
Optional HUDs
Collections
- HUD images here shows some 40 of the available optional HUDs
- OXP List - scroll down for the list - clicking on the Category column will sort all the HUDs together in the middle of the table!
- Guide to Unlisted OXPs - HUDs are collected together perhaps a quarter of the way down the page...
- Category:HUDs OXPs - collection of tagged HUDs pages on this wiki
Handling them
- HUDSelector - a HUD manager - comes with 3 new HUDs
- MFD - multi-functional displays (green boxes on the viewscreen): listed with HUDs in the lists below
- OXZ List - scroll down for the HUDs
Discussions
- What do YOU use Roll & Pitch Gauges for? (2024)
- 3d cockpit idea (2017)
- Lasers and cabin temperature (2014)
- HUD elements: which are essential, delightful, superfluous? (2012)
- HUDs or Cockpits? BB thread (2010)
- The HUD-shop BB thread (2009-10)
Oolite Equipment
|
