Difference between revisions of "Mission screen"
(→Alignment: Added about padText- functions, no code yet) |
(Updating BB links) |
||
| (7 intermediate revisions by 2 users not shown) | |||
| Line 2: | Line 2: | ||
[[File:Hints.png|right|320px]] | [[File:Hints.png|right|320px]] | ||
| − | Mission screens started off as screens which allow the player to interface with NPCs in a mission.oxp. | + | [[File:Telescope2Beta station options.jpg|right|320px]] |
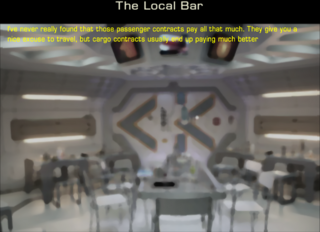
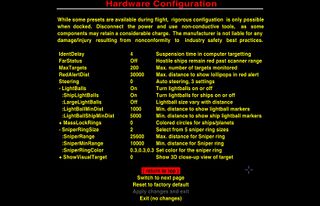
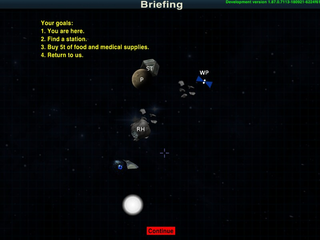
| + | Mission screens started off as screens which allow the player to interface with NPCs in a mission.oxp. But they now also allow other sorts of "communication" or choice-making as in the conversations overheard in the bar in the [[Hints]] OXP, or the settings for [[Station Options]]. | ||
They can have backdrops, changes in text and allow choices for the player. | They can have backdrops, changes in text and allow choices for the player. | ||
| Line 37: | Line 38: | ||
== Colour == | == Colour == | ||
| − | :Choices can be non-yellow (have a look at the various contracts interfaces in 1.77) but there is a more fundamental limitation of the current UI code that all text on a particular line has to be the same colour. [ | + | :Choices can be non-yellow (have a look at the various contracts interfaces in 1.77) but there is a more fundamental limitation of the current UI code that all text on a particular line has to be the same colour. [https://bb.oolite.space/viewtopic.php?p=203777#p203777 Cim (2013)] |
| − | :Code for [ | + | :Code for [https://bb.oolite.space/viewtopic.php?p=283402#p283402 Colour change] |
[[File:First Finance Loan Management.png|right|300px]] | [[File:First Finance Loan Management.png|right|300px]] | ||
| Line 46: | Line 47: | ||
=== Tab stops === | === Tab stops === | ||
| − | Although there are no built-in tabs, | + | Although there are no built-in tabs, they can be imitated with some JavaScript. Below you can find some of the basic functions for formating the text, but in various OXPs you can find them under other names, as well as others that can be a way more complex and specialized. |
However, their core principle remains the same - they add invisible characters to the string passed to them up to the desired width - just as you can do it in a text editor, by adding spaces you can get (almost) any kind of text tabulation. The functions, however, don't use a rather wide regular space, but a narrow hair space, which allows text to align more accurately. | However, their core principle remains the same - they add invisible characters to the string passed to them up to the desired width - just as you can do it in a text editor, by adding spaces you can get (almost) any kind of text tabulation. The functions, however, don't use a rather wide regular space, but a narrow hair space, which allows text to align more accurately. | ||
| + | The unit of text width is em - the intrinsic unit size of a font. The mission screen is 32 em wide and text wider than that will wrap with breaks on spaces. You can measure the width of a string using <code>[[Oolite_JavaScript_Reference:_Global#defaultFont|defaultFont.measureString]]</code>. | ||
| + | |||
| + | Here you can see one of the implementations of <code>_limitText</code>, <code>_padTextLeft</code>, <code>_padTextRight</code> and <code>_padTextAround</code> functions. Feel free to use it in your work! | ||
| + | <pre style="max-width: max-content; max-height: 40vh; overflow-y: auto;"> | ||
| + | /** | ||
| + | * The function cuts text to limitWidth if necessary, and adds an ellipsis in this case. | ||
| + | * It's useful when you want to display text that may be larger than the available space, such as ship names. | ||
| + | * Large text, if left unprocessed, can make the rest of the formatting go haywire. | ||
| + | * | ||
| + | * text - the string to make sure that it won't be longer than limitWidth | ||
| + | * limitWidth - the maximum width of the result, in ems | ||
| + | * result - the limited string | ||
| + | */ | ||
| + | this._limitText = function _limitText(text, limitWidth) { | ||
| + | const ellipsis = "…"; | ||
| + | |||
| + | var tmp = text; | ||
| + | |||
| + | while (defaultFont.measureString(tmp) > limitWidth) { // until text in wider than limit | ||
| + | // remove from the text two last characters and add an ellipsis | ||
| + | // two because we need to remove an ellipsis from previous iteration | ||
| + | tmp = tmp.substring(0, tmp.length - 2) + ellipsis; | ||
| + | } | ||
| + | |||
| + | return tmp; | ||
| + | } | ||
| + | |||
| + | /** | ||
| + | * The functions below add hair spaces to the text to make it have a desiredWidth, | ||
| + | * but in case if text is too wide, the function do the _limitText instead. | ||
| + | * | ||
| + | * To reduce the duplication of code they all just shorcuts for more generic _padText | ||
| + | * | ||
| + | * text - the string that we want to have a desiredWidth | ||
| + | * desiredWidth - the width of the result, in ems | ||
| + | * result - the padded string | ||
| + | */ | ||
| + | this._padTextLeft = function _padTextLeft(text, desiredWidth) { | ||
| + | return this._padText(text, desiredWidth, "left"); | ||
| + | } | ||
| + | |||
| + | this._padTextRight = function _padTextRight(text, desiredWidth) { | ||
| + | return this._padText(text, desiredWidth, "right"); | ||
| + | } | ||
| + | |||
| + | this._padTextAround = function _padTextAround(text, desiredWidth) { | ||
| + | return this._padText(text, desiredWidth, "both"); | ||
| + | } | ||
| + | |||
| + | /** | ||
| + | * The function add hair spaces to the text to make it have a desiredWidth. | ||
| + | * But in case if text is too wide, the function do _limitText instead. | ||
| + | * | ||
| + | * text - the string that we want to have a desiredWidth | ||
| + | * desiredWidth - the width of the result, in ems | ||
| + | * padSide: | ||
| + | * "left" - add pads before the text | ||
| + | * "right" - add pads after the text | ||
| + | * "both" - add pads both before and after the text | ||
| + | * result - the padded string | ||
| + | */ | ||
| + | this._padText = function _padText(text, desiredWidth, padSide) { | ||
| + | // Keep character and it's width it variables for sake of optimization and clarity | ||
| + | const hairSpace = String.fromCharCode(31); | ||
| + | const hairSpaceWidth = defaultFont.measureString(hairSpace); | ||
| + | |||
| + | // Find out the width of text in ems | ||
| + | const textWidth = defaultFont.measureString(text); | ||
| + | |||
| + | const padsNeeded = Math.floor((desiredWidth - textWidth) / hairSpaceWidth); | ||
| + | |||
| + | var resultText; | ||
| + | if (padsNeeded > 1) { | ||
| + | // new Array(n).join(someString) - the compact way to say "repeat the someString n times" | ||
| + | if (padSide == "left") { | ||
| + | resultText = new Array(padsNeeded).join(hairSpace) + text; | ||
| + | } | ||
| + | else if (padSide == "right") { | ||
| + | resultText = text + new Array(padsNeeded).join(hairSpace); | ||
| + | } | ||
| + | else if (padSide == "both") { | ||
| + | const leftPadsNumber = Math.floor(padsNeeded / 2); | ||
| + | const leftPadding = new Array(leftPadsNumber).join(hairSpace); | ||
| + | const rightPadding = new Array(padsNeeded - leftPadsNumber).join(hairSpace); | ||
| + | |||
| + | resultText = leftPadding + text + rightPadding; | ||
| + | } | ||
| + | } | ||
| + | else { | ||
| + | resultText = this.$limitText(text, desiredWidth); | ||
| + | } | ||
| + | |||
| + | return resultText; | ||
| + | } | ||
| + | </pre> | ||
=== Tabular layout === | === Tabular layout === | ||
| Line 72: | Line 168: | ||
var table = tableHeader + "\n" + tableRows.join("\n") + "\n\n"; | var table = tableHeader + "\n" + tableRows.join("\n") + "\n\n"; | ||
</pre> | </pre> | ||
| − | |||
[[User:Alaric/KV-16 Owners Manual|Alaric's unfinished Torus-field-monitor OXZ]] contains handy function to help format text in tabular layout for use in mission screens/MFDs. See his alaric-oxp-utilities.js file: | [[User:Alaric/KV-16 Owners Manual|Alaric's unfinished Torus-field-monitor OXZ]] contains handy function to help format text in tabular layout for use in mission screens/MFDs. See his alaric-oxp-utilities.js file: | ||
| + | [[File:Alaric's_Tabular_text_for_MDFs_mission_screens.png|right|300px]] | ||
<pre style="max-width: max-content; max-height: 40vh; overflow-y: auto;"> | <pre style="max-width: max-content; max-height: 40vh; overflow-y: auto;"> | ||
"use strict"; | "use strict"; | ||
| Line 297: | Line 393: | ||
or you can use ''overlay'' instead of ''background'' (less conflicts with other oxp's such as XenonUI which also tend to specify a background) | or you can use ''overlay'' instead of ''background'' (less conflicts with other oxp's such as XenonUI which also tend to specify a background) | ||
| − | === Problems | + | === Problems: Invisible === |
These can be prevented from appearing by other oxp's such as [[XenonUI]] which also create backdrops for the docked screens. | These can be prevented from appearing by other oxp's such as [[XenonUI]] which also create backdrops for the docked screens. | ||
| − | Using ''overlay'' helps, but also see Phkb's comments [ | + | Using ''overlay'' helps, but also see Phkb's comments [https://bb.oolite.space/viewtopic.php?p=282180#p282180 here] (for Dark Side solutions) and [https://bb.oolite.space/viewtopic.php?p=278857#p278857 here] (using Library config). |
| + | |||
| + | |||
| + | === Problems: Blurry/Wrong size === | ||
| + | See [https://bb.oolite.space/viewtopic.php?f=4&t=17487 Background image sizes] (2015) | ||
== Exit Screen == | == Exit Screen == | ||
| Line 369: | Line 469: | ||
== Links == | == Links == | ||
| − | *[ | + | *[https://bb.oolite.space/viewtopic.php?p=276448#p276448 Creating a mission screen] for textual messages (2021) |
| − | *[ | + | *[https://bb.oolite.space/viewtopic.php?p=283395#p283395 Changing text colour] (2022) |
| − | *[ | + | *[https://bb.oolite.space/viewtopic.php?f=4&t=18713 New Line in mission.runScreen?] (2017) |
| − | *[ | + | *[https://bb.oolite.space/viewtopic.php?f=4&t=18414 Tabular text output for MFDs/mission screens] (2016) |
| + | *[https://bb.oolite.space/viewtopic.php?f=4&t=8494 Mission screen images] (2010) Overlays & backgrounds: combinations and scaling | ||
=== Useful OXPs === | === Useful OXPs === | ||
*[[HDBG]] - High Definition BackGrounds - provides background pictures for Mission Screens | *[[HDBG]] - High Definition BackGrounds - provides background pictures for Mission Screens | ||
| Line 378: | Line 479: | ||
*[[Library OXP]] - enables animated Mission Screens | *[[Library OXP]] - enables animated Mission Screens | ||
| − | + | === Proofs of concept === | |
| + | *[https://bb.oolite.space/viewtopic.php?p=290407#p290407 3 Register Key.oxp demos] (Phkb 2023) for using the v.1.91 recognition of more than just the "enter" key on missions screens | ||
[[Category:Oolite scripting]] | [[Category:Oolite scripting]] | ||
Latest revision as of 02:10, 29 February 2024
Mission screens started off as screens which allow the player to interface with NPCs in a mission.oxp. But they now also allow other sorts of "communication" or choice-making as in the conversations overheard in the bar in the Hints OXP, or the settings for Station Options.
They can have backdrops, changes in text and allow choices for the player.
The text can be placed in a descriptions.plist, details about it in a script.js (but everything can go in the script.js if so desired).
Contents
Text
- Several special spatial characters can be used in determining the layout of the text, just as in this Wiki.
   \" Enables the use of colons.
   \\n Insert a hard Enter.
In XML:
\n Inserts a hard Enter.
- See Missiontext.plist for more complexity (eg random names, naming current system etc)
- Character '31' (hex:1F, octal:037) is a narrow 'hair-space'. Custom font OXPs should ensure that this character is blank and has the same narrow width as the core font definition, as it is used to allow an equivalent to 'tab stops' in mission text.
% codes
Here are the % codes that can be used inside description strings and what each one does:
Code:
- %H is replaced with <planetName>. If systemName is nil, a planet name is retrieved through -[Universe getSystemName:], treating <seed> as a system seed.
- %I is equivalent to "%H[planetname-derivative-suffix]".
- %N is replaced with a random "alien" name using the planet name digraphs. If used more than once in the same string, it will produce the same name on each occurence.
- %R is like %N but, due to a bug, misses some possibilities. Deprecated.
- %JNNN, where NNN is a three-digit integer, is replaced with the name of system ID NNN in the current galaxy.
- %GNNNNNN, where NNNNNN is a six-digit integer, is replaced with the name of system ID NNN (first triplet) in the specified galaxy (second triplet).
- %% is replaced with %.
- %[ is replaced with [.
- %] is replaced with ].
- From String expansion
Colour
- Choices can be non-yellow (have a look at the various contracts interfaces in 1.77) but there is a more fundamental limitation of the current UI code that all text on a particular line has to be the same colour. Cim (2013)
- Code for Colour change
Alignment
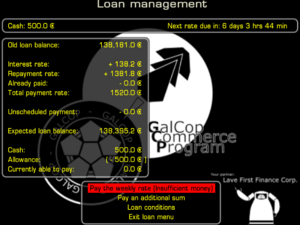
There is no obvious way to do this, but Ocz managed some version of right alignment for his First Finance OXP
Tab stops
Although there are no built-in tabs, they can be imitated with some JavaScript. Below you can find some of the basic functions for formating the text, but in various OXPs you can find them under other names, as well as others that can be a way more complex and specialized. However, their core principle remains the same - they add invisible characters to the string passed to them up to the desired width - just as you can do it in a text editor, by adding spaces you can get (almost) any kind of text tabulation. The functions, however, don't use a rather wide regular space, but a narrow hair space, which allows text to align more accurately.
The unit of text width is em - the intrinsic unit size of a font. The mission screen is 32 em wide and text wider than that will wrap with breaks on spaces. You can measure the width of a string using defaultFont.measureString.
Here you can see one of the implementations of _limitText, _padTextLeft, _padTextRight and _padTextAround functions. Feel free to use it in your work!
/**
 * The function cuts text to limitWidth if necessary, and adds an ellipsis in this case.
 * It's useful when you want to display text that may be larger than the available space, such as ship names.
 * Large text, if left unprocessed, can make the rest of the formatting go haywire.
 *
 * text - the string to make sure that it won't be longer than limitWidth
 * limitWidth - the maximum width of the result, in ems
 * result - the limited string
 */
this._limitText = function _limitText(text, limitWidth) {
    const ellipsis = "…";

    var tmp = text;

    while (defaultFont.measureString(tmp) > limitWidth) { // until text in wider than limit
        // remove from the text two last characters and add an ellipsis
        // two because we need to remove an ellipsis from previous iteration
        tmp = tmp.substring(0, tmp.length - 2) + ellipsis;
    }

    return tmp;
}

/**
 * The functions below add hair spaces to the text to make it have a desiredWidth,
 * but in case if text is too wide,  the function do the _limitText instead.
 *
 * To reduce the duplication of code they all just shorcuts for more generic _padText
 *
 * text - the string that we want to have a desiredWidth
 * desiredWidth - the width of the result, in ems
 * result - the padded string
 */
this._padTextLeft = function _padTextLeft(text, desiredWidth) {
    return this._padText(text, desiredWidth, "left");
}

this._padTextRight = function _padTextRight(text, desiredWidth) {
    return this._padText(text, desiredWidth, "right");
}

this._padTextAround = function _padTextAround(text, desiredWidth) {
    return this._padText(text, desiredWidth, "both");
}

/**
 * The function add hair spaces to the text to make it have a desiredWidth.
 * But in case if text is too wide, the function do _limitText instead.
 *
 * text - the string that we want to have a desiredWidth
 * desiredWidth - the width of the result, in ems
 * padSide:
 *     "left" - add pads before the text
 *     "right" - add pads after the text
 *     "both" - add pads both before and after the text
 * result - the padded string
 */
this._padText = function _padText(text, desiredWidth, padSide) {
    // Keep character and it's width it variables for sake of optimization and clarity
    const hairSpace = String.fromCharCode(31);
    const hairSpaceWidth = defaultFont.measureString(hairSpace);

    // Find out the width of text in ems
    const textWidth = defaultFont.measureString(text);

    const padsNeeded = Math.floor((desiredWidth - textWidth) / hairSpaceWidth);

    var resultText;
    if (padsNeeded > 1) {
        // new Array(n).join(someString) - the compact way to say "repeat the someString n times"
        if (padSide == "left") {
            resultText = new Array(padsNeeded).join(hairSpace) + text;
        }
        else if (padSide == "right") {
            resultText = text + new Array(padsNeeded).join(hairSpace);
        }
        else if (padSide == "both") {
            const leftPadsNumber = Math.floor(padsNeeded / 2);
            const leftPadding = new Array(leftPadsNumber).join(hairSpace);
            const rightPadding = new Array(padsNeeded - leftPadsNumber).join(hairSpace);

            resultText = leftPadding + text + rightPadding;
        }
    }
    else {
        resultText = this.$limitText(text, desiredWidth);
    }

    return resultText;
}
Tabular layout
When you need to get something in the form of a table or columns, you can use padText-like functions to adjust the padding of the desired width to labels and data, and then concatenate them into one line, just keep in mind that max row length is 32 em.
var pad1em = this._padTextLeft("", 1);
var tableHeader = this._padTextLeft("#", 3) + pad1em +
    this._padTextRight("Item", 11) + pad1em +
    this._padTextAround("Remaining, pcs.", 7) + pad1em +
    this._padTextAround("Price, ₢ ", 7) + pad1em;

var tableRows = Array(this.$items.length);
for(var i = 0; i < this.$items.length; i++) {
    var item = this.$items[i];
    tableRows[i] = this._padTextLeft(i + 1, 3) + pad1em +
    this._padTextRight(item.name, 11) + pad1em +
    this._padTextAround(item.quantity, 7) + pad1em +
    this._padTextLeft(formatCredits(item.price), 7) + pad1em;
}

// Concatenate them in one string if you want to display
// the table as "message" on the mission screen
var table = tableHeader + "\n" + tableRows.join("\n") + "\n\n";
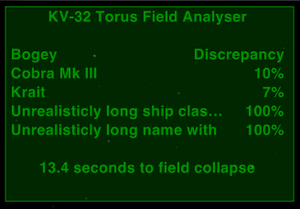
Alaric's unfinished Torus-field-monitor OXZ contains handy function to help format text in tabular layout for use in mission screens/MFDs. See his alaric-oxp-utilities.js file:
"use strict";

this.name        = "alaric-oxp-utilities";
this.author      = "Alaric";
this.copyright   = "2016 Alaric";
this.description = "General helper functions for OXPs";
this.licence     = "CC BY-NC-SA 3.0 AU";
this.version	 = "1.0";

/**
* Trims a length of text to fit in the available width. If the text is truncated,
* an ellipse (U+2026) will be appended unless <ellipses> is false. If <ellipses>
* is omitted from the call, it defaults to true.
*
* text				- The text to trim
* emDisplayWidth	- The available width, in Em, to display the text
* ellipses			- optional (default: true)
*
* Returns the new, trimmed, string.
*/
this._trimTextToFitWidth = function(text, emDisplayWidth, ellipses)
{
	var font = defaultFont;
	var chPadding = String.fromCharCode(31);
	var ellipsesText = "\u2026";
	var emEllipsesText = font.measureString(ellipsesText);
	var emPaddingText = font.measureString(chPadding);

	var chWidth = [0, text.length];
	var emWidth = [font.measureString(text), 0];

	// use default for ellipses if not supplied
	if (ellipses === null || ellipses === undefined) ellipses = true;

	// if the text already fits, just return it.
	if (emWidth[0] <= emDisplayWidth) return text;

	// if the display width is too short for ellipses, disable ellipses
	if (emEllipsesText >= emDisplayWidth) ellipses = false;

	// subtract ellipses with from display width if ellipses is true
	emDisplayWidth -= (ellipses) ? emEllipsesText : 0;

	while (chWidth[0] != chWidth[1])
	{
		// get Em width of text at length midway between chWidth[0] and chWidth[1]
		var chPivot = Math.ceil((chWidth[0] + chWidth[1]) / 2);
		var emPivot = font.measureString(text.substring(0, chPivot));

		// update for next split point based on the text being too long or too short
		var flagDirection = (emPivot <= emDisplayWidth) ? 0 : 1;

		chWidth[flagDirection] = chPivot - flagDirection;
		emWidth[flagDirection] = emPivot;
	}

	// At this point, chWidth[0] and emWidth[0] contain the trimmed width in
	// characters and Em respectively. Return the text, appending ellipses if
	// <ellipses> is true. The space for ellipses has already been accounted
	// for.

	return (ellipses)
		? text.substring(0, chWidth[0]) + ellipsesText
		: text.substring(0, chWidth[0])
		;
}


/*
* Builds tabular (columns aligned) text for use in mission screens/MFDs.
*
* Input to the function is provided by an array of 'rows'. Each row is, itself, an array of
* objects with the following properties:
*
* Required properties:
*	text:	The text to display in this column
*	width:	The width of the column in em. Text will be truncated if too long.
*
* Optional properties:
*	alignment:	LEFT, RIGHT or CENTER. Default: LEFT
*	elipses:	Display elipses for truncated text? Default: true.
*  blink:
*
* Multiple rows are deliniated by '\n'. No '\n' is appended to the last row.
*
*/
this._buildTabularText = function(rows)
{
	var padCharacter = String.fromCharCode(31);
	var padWidth = defaultFont.measureString(padCharacter);
	var tabularText = "";
	var row;

	for (row = 0; row < rows.length; ++row)
	{
		if (row > 0) tabularText += "\n";

		var i;

		var currentEm0 = 0;
		var currentEm1 = 0;
		var columns = rows[row];
		var rowText = "";

		for (i = 0; i < columns.length; ++i)
		{

			currentEm0 = defaultFont.measureString(rowText);
			var leading = (currentEm1 - currentEm0);
			currentEm1 = currentEm1 + columns[i].width;

			var text = this._trimTextToFitWidth(columns[i].text, currentEm1 - currentEm0, columns[i].ellipses);
			var width = defaultFont.measureString(text);


			var padding = (currentEm1 - currentEm0) - width;

			switch ((columns[i].alignment !== undefined) ? columns[i].alignment : "LEFT")
			{

				case "LEFT" : padding = 0; break;
				case "RIGHT" : leading = 0; break;
 				case "CENTER" : padding = padding / 2; break;

				default:
					log(this.name, "invalid alignment '" + columns[i].alignment + "'");
					padding = 0; break;

			}

			padding = Math.floor((leading + padding) / padWidth);

			rowText += (padding >= 1)
				? new Array(padding).join(padCharacter) + text
				: text
				;
		}

		tabularText += rowText;
	}

	return tabularText;
}
You can use it like this:
var rows = [
        [ /* header */
            { width: 32, alignment: "CENTER", text: "Fleet status" }
        ],

        [ /* line spacer */
        ],

        [ /* row 1 */

            { width: 1.5, text: "" },	// spacer
            { width: 20.5, alignment: "LEFT", text: "Ship" },
            { width: 10,   alignment: "RIGHT", text: "Maintenance" }
        ],
        [ /* row 2 */
            { width:   1, alignment: "RIGHT", text: "1" },
            { width: 0.5, alignment: "RIGHT", text: "" },	// spacer
            { width:  28, alignment: "LEFT", text: "Cobra Mk III" },
            { width: 2.5, alignment: "RIGHT", text: "10%" }
        ],

        [ /* row 3 */
            { width:   1, alignment: "RIGHT", text: "2" },
            { width: 0.5, alignment: "RIGHT", text: "" },	// spacer
            { width:  28, text: "Krait" },
            { width: 2.5, alignment: "RIGHT", text: "7%" }
        ],

        [ /* row 4 */
            { width:   1, alignment: "RIGHT", text: "3" },
            { width: 0.5, alignment: "RIGHT", text: "" },	// spacer
            { width:  28, alignment: "LEFT", text: "Unrealisticly long ship class name that happens to be not so long for mission screen" },
            { width: 2.5, alignment: "RIGHT", text: "100%" }
        ],

        [ /* row 5 */
            { width:   1, alignment: "RIGHT", text: "4" },
            { width: 0.5, alignment: "RIGHT", text: "" },	// spacer
            { width:  28, alignment: "LEFT", text: "Unrealisticly long name without ellipses that happens to be not so long for mission screen", ellipses: false },
            { width: 2.5, alignment: "RIGHT", text: "100%" }
        ],

        [
        ],

        [
            { width: 32, alignment: "CENTER", text: "Next enemy group encounter in 4 hours" }
        ]
    ]

);

var utils = worldScripts["alaric-oxp-utilities"]; // Get world script object if you copied entire file to your OXP
var messageText = utils._buildTabularText(rows); // or use this._buildTabularText(rows), if you copied just that funtions in your world script

mission.runScreen({
    title: "Statistics",
    screenID: "oxpname-stats-fleet"
    message: messageText
});
Backdrop
- This is managed from within the script.js file:
background: ""the_file_name_of_the_image_you_want_to_display_must_be_in_the_images_folder.png",
or you can use overlay instead of background (less conflicts with other oxp's such as XenonUI which also tend to specify a background)
Problems: Invisible
These can be prevented from appearing by other oxp's such as XenonUI which also create backdrops for the docked screens.
Using overlay helps, but also see Phkb's comments here (for Dark Side solutions) and here (using Library config).
Problems: Blurry/Wrong size
See Background image sizes (2015)
Exit Screen
By default, when the mission screen ends, the game returns to the status screen (F5), but this behavior can be changed.
In most cases you can just provide the exitScreen parameter to the mission.runScreen call, but if
if the exit screen depends on the player's choice, you need change the exit screen in the mission screen callback by setting mission.exitScreen. Outside of a callback function, the value of this is almost meaningless, and setting it has no useful effect.
The example below uses both ways:
this._runMissionScreen = function _runMissionScreen()
{
    mission.runScreen(
        {
            title: "Exit Screen Example",
            exitScreen: "GUI_SCREEN_MARKET", // <-- The first way
            choices: {
                "01_INTERFACES": "Do nothing",
                "02_CHART": "Set mission.exitScreen to \"GUI_SCREEN_SHORT_RANGE_CHART\"",
                "03_SYSDATA": "Set mission.exitScreen to \"GUI_SCREEN_SYSTEM_DATA\"",
                "04_INVALID": "Set mission.exitScreen to \"INVALID VALUE\"",
            }
        },
        this._missionScreenCallback.bind(this)
    );
    // The mission.exitScreen variable is set to the value
    // of the exitScreen parameter of the function call above
    mission.addMessageText("Current exit screen is " + mission.exitScreen + ".");
};

this._missionScreenCallback = function _missionScreenCallback(choice)
{
    // The choice is null when player interrupts the mission screen (e.g., presses F1 )
    if (choice === "01_INTERFACES" || choice === null) {
        // Do nothing - the exit screen will be as specified in runScreen call
    }
    else if (choice === "02_CHART") {
        mission.exitScreen = "GUI_SCREEN_SHORT_RANGE_CHART"; // <-- The second way
    }
    else if (choice === "03_SYSDATA") {
        mission.exitScreen = "GUI_SCREEN_SYSTEM_DATA";
    }
    else if (choice === "04_INVALID") {
        mission.exitScreen = "INVALID VALUE"; // The exit screen will be reset to default
    }
};

// Add interface to F4 page for docked station
this.startUpComplete = function startUpComplete()
{
    player.ship.dockedStation.setInterface("example_exit_screen",
        {
            title: "Show exitScreen example screen",
            summary: "This is an example interface definition.",
            category: "AAA",
            callback: this._runMissionScreen.bind(this)
        }
    );
};
Visual Mission screens
It is possible to have animations or cutscenes instead. These require either Library.oxp or the deprecated CCL.
These two oxp's allow for more complex interractions. See Library OXP's "Music" and the two "Demos" (Starmap & Animator). And see also the deprecated CCL's never-used Cutscene.
Links
- Creating a mission screen for textual messages (2021)
- Changing text colour (2022)
- New Line in mission.runScreen? (2017)
- Tabular text output for MFDs/mission screens (2016)
- Mission screen images (2010) Overlays & backgrounds: combinations and scaling
Useful OXPs
- HDBG - High Definition BackGrounds - provides background pictures for Mission Screens
- HDBG Image Pack A (alas, Image Pack B never emerged...)
- Library OXP - enables animated Mission Screens
Proofs of concept
- 3 Register Key.oxp demos (Phkb 2023) for using the v.1.91 recognition of more than just the "enter" key on missions screens

