Difference between revisions of "Joysticks: Guide to Setting Up"
Cholmondely (talk | contribs) (Added more stuff!) |
Cholmondely (talk | contribs) (→CH Combat Stick & Throttle Pro: Tweak!) |
||
| Line 138: | Line 138: | ||
=== CH Combat Stick & Throttle Pro === | === CH Combat Stick & Throttle Pro === | ||
| − | [[File:CH Combat Stick with Pro Throttle.png|450px|thumb|right| | + | [[File:CH Combat Stick with Pro Throttle.png|450px|thumb|right|Throttle Pro & Combat Stick - the mid-range of CH's 3 joysticks]]. CH's stuff is rugged and is expected to last for decades. It is also light-weight and looks clunky! And big for the hands. |
The '''CH Combat Stick''' has a two-axis joystick only (no twist) with fine-tuning thumbwheels which can eliminate drunkenness. There is the trigger, a pinky button (Joy_4) and 4 other buttons (Joy_5 is on the far side of the joystick, reached by the index finger). There are two hat-switches. There is a 3rd thumbwheel which can act as a throttle. | The '''CH Combat Stick''' has a two-axis joystick only (no twist) with fine-tuning thumbwheels which can eliminate drunkenness. There is the trigger, a pinky button (Joy_4) and 4 other buttons (Joy_5 is on the far side of the joystick, reached by the index finger). There are two hat-switches. There is a 3rd thumbwheel which can act as a throttle. | ||
'''The Pro Throttle''' has ''all'' the controls on the throttle itself - none on the base. There are 3 buttons behind the throttle handle and 5 hat-switches! The rightmost of these on the 'lozenge' on the side of the throttle is actually a mini-joystick which can be pressed and acts as a fourth button. | '''The Pro Throttle''' has ''all'' the controls on the throttle itself - none on the base. There are 3 buttons behind the throttle handle and 5 hat-switches! The rightmost of these on the 'lozenge' on the side of the throttle is actually a mini-joystick which can be pressed and acts as a fourth button. | ||
| Line 154: | Line 154: | ||
*Top hat switch on throttle side - ''Special .oxp equipment'': UP (Prime: '''shift-n'''); DOWN (Activate: '''n'''); LEFT (Modify: '''b''') | *Top hat switch on throttle side - ''Special .oxp equipment'': UP (Prime: '''shift-n'''); DOWN (Activate: '''n'''); LEFT (Modify: '''b''') | ||
*Bottom hat switch on throttle side - ''Docking'': UP (Fast docking: '''shift-c'''); DOWN (Blue Danube docking: '''c'''); LEFT (request docking clearance: '''shift-l''') | *Bottom hat switch on throttle side - ''Docking'': UP (Fast docking: '''shift-c'''); DOWN (Blue Danube docking: '''c'''); LEFT (request docking clearance: '''shift-l''') | ||
| − | *Hat switch on back side of throttle - ''Scanner/Compass'': UP (Scanner Zoom: '''z'''); DOWN (Unzoom: '''shift-z'''); LEFT ([[ASC]] next target: '''\''') | + | *Hat switch on back side of throttle - ''Scanner/Compass'': UP (Scanner Zoom: '''z'''); DOWN (Unzoom: '''shift-z'''); LEFT ([[ASC]] next target: '''\''') |
| − | *The right side settings of the throttle hat switches not used (waiting for reverse prime '''ctrl-shift-n''' & ASC last target '''|'''). | + | *The right side settings of the throttle hat switches not used (waiting for reverse prime '''ctrl-shift-n''' & ASC last target '''|''' options to be added to the configuration pages). |
*Joy_1 - (trigger) - fire laser ('''a''') | *Joy_1 - (trigger) - fire laser ('''a''') | ||
*Joy_2 - toggle ID ('''r''') | *Joy_2 - toggle ID ('''r''') | ||
| Line 163: | Line 163: | ||
*Joy_6 - unset missile ('''u''') ''to neuter the ILS and the Automatic Targetting when they select an unwanted target'' | *Joy_6 - unset missile ('''u''') ''to neuter the ILS and the Automatic Targetting when they select an unwanted target'' | ||
*3 buttons on the back side of the throttle: ''drives!'': Witchfuel injectors ('''i'''); Torus drive ('''j''') & Witchspace drive ('''h''') | *3 buttons on the back side of the throttle: ''drives!'': Witchfuel injectors ('''i'''); Torus drive ('''j''') & Witchspace drive ('''h''') | ||
| − | |||
== Links == | == Links == | ||
Revision as of 01:11, 15 January 2021
Cholly's guide to Setting up Joystick Configurations in Oolite 1.90
Contents
Introduction
This guide deals only with assigning in-game functions (such as steering or firing a missile) to the axes and buttons on a joystick/throttle.
For setting up an axis profile (to correct a drunken bias - or to achieve more precision in flight) - read Dizzy's guide to Setting up Joystick Axis Profiles
Important Points
*Be careful of what you assign to buttons/axes on the base of the joystick/throttle. You will need to let go of the joystick/throttle to get to the buttons on the base. If this is in the middle of a combat, you could find yourself well and truly stuffed, as you can no longer steer/change speed. So avoid assigning functions such as witchspace fuel injectors (i) or firing missiles (m) to the base of your unit!
Some definitions
- Axis
- An analogue-style input where your movements select the amount of change (not available for purely keyboard inputs)
- There are at least 4 types of axis:
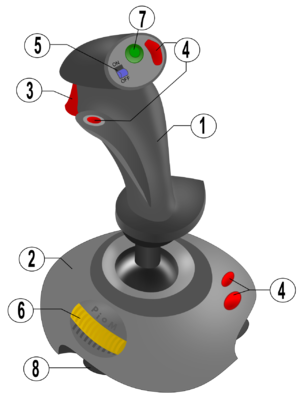
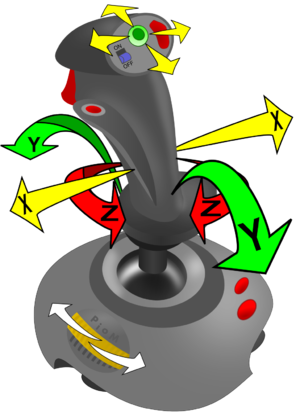
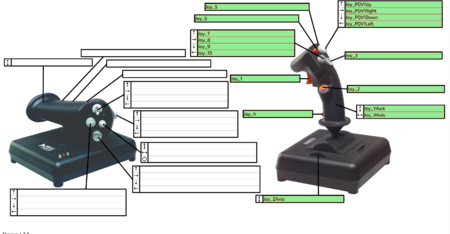
- The usual two axes of a joystick (forwards <–> backwards & left <-> right) - x & y above right
- Some joysticks have twist as well (clockwise ↔ anti-clockwise) - z above right
- A thumbwheel - 6 above left
- A mini-joystick - not shown above - can look identical to the hat switch, but with very different operation - will add two more x & y axes
- Button
- A more digital On/Off input: Either (i) press once (F2 rear view), (ii) keep pressed (Fire laser)
- There are at least 6 types of button:
- A button that looks like a button! - 4 above left
- A switch (operates like 2 buttons) - 7 above left
- A trigger (operates like a button) - 3 above left
- A hat switch (operates like 4 buttons) - 6 above left
- A button incorporated into a mini-joystick - not shown here - but see the CH Pro Throttle below
- A rotary switch where one turns the knob to select one of a number of options - not shown here - but see the black left hand knobs on the Saitek radio panel here
- Hat switch (used to be called a coolie hat switch) - see buttons
- POV switch (Point Of View switch – same as hat switch) - see buttons
Examples
Logitech Extreme 3D Pro
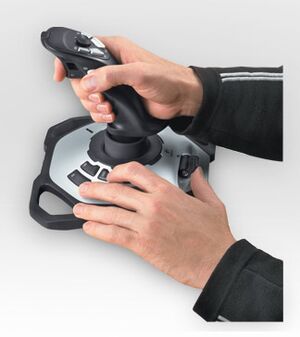
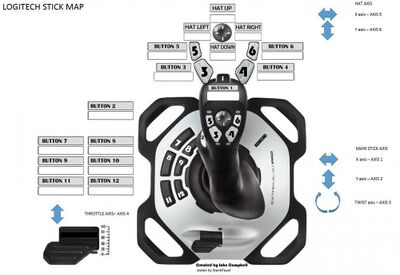
- The Logitech joystick has a 3-way axis for the stick (including the 3rd twist axis) and another throttle axis on the base.
- There are twelve buttons: 6 on the stick (including the trigger and button 2 on the left of the stick where the thumb rests) and 6 on the base.
- The hat switch on the stick is actually an 8-way switch which can function as a mini-joystick giving another 2 axes if desired.
- The software for the Logitech joystick allows the buttons to be programmed to operate macros if so desired.
Cody's settings for the Logitech Extreme 3D Pro: Cody uses this joystick with a keyboard. The precision toggle is not used because the axis profiles were set so as to no longer need it. Cody is an old timer who mastered Classic Elite before joining the Oolite boards over a decade ago.
- Axis 1 - roll (left/right arrows)
- Axis 2 - pitch (up/down arrows)
- Axis 3 - not used (twist): Cody favours the Rollers in the Roll vs Yaw crusades
- Axis 4 - not used (throttle)
- Axis 5 - (hatswitch) used instead as buttons - for views - left & right (F3 & F4)
- Axis 6 - (hatswitch) used instead as buttons - for views - up & down (F1 & F2)
- Button 1 - (trigger) - fire laser (a)
- Button 2 - docking - request docking clearance (shift-l)
- Button 3 - missile - arm missile (t)
- Button 4 - missile - fire missile (m)
- Button 5 - take snapshot (*)
- Button 6 - missile - cycle missile (y)
- Button 7 - next ASC compass target (\)
- Button 8 - not yet used
- Button 9 - docking - Blue Danube docking computer (c)
- Button 10 - docking - fast docking computer (shift-c)
- Button 11 - Activate .oxp equipment (n)
- Button 12 - Prime .oxp equipment (shift-n)
Nite Owl's settings for the Logitech Extreme 3D Pro. Another veteran, like Cody, but with a more combat oriented set of joystick bindings.
- Axis 1 - Joystick left and right axis as Left and Right Roll. (Editorial note: like Cody, a veteran elitist in the Roll vs Yaw crusades)
- Axis 2 - Joystick forward and back axis as Pitch Up and Down.
- Axis 3 - Joystick left and right twist axis as Pitch Left and Right.
- Axis 4 - The throttle axis for the ship's Throttle.
- The hat switch for changing views in the obvious manner.
- Button 1 Fire main weapon (Laser) (a)
- Button 2 Fire secondary weapon (Pylon) (m)
- Button 3 Targeting I.D. On/Off (r)
- Button 4 Weapons On/Off (shift-hyphen: _)
- Button 5 Torus Drive On/Off (j)
- Button 6 Fuel Injectors (Hold to Use) (i)
- Button 7 Set Equipment Mode (b)
- Button 8 Prime Equipment (shift-n)
- Button 9 Target Incoming Missile (shift-t)
- Button 10 Fast Target Selector (OXZ set up as Fast Activate 1, key = zero, and then the zero key is mapped to the Joystick)
- Button 11 Scanner Zoom (z)
- Button 12 Activate E.C.M. (e)
"Axes 2 & 3 may seem counter intuitive - but they work for me. My guess is that most Commanders would have these two reversed. Also have some very nice spline curves set up as per Dizzy's Guide mentioned at the top and bottom of this page. Everything else is accessed via the keyboard controls. The Advanced Navigation Computer (OXZ) is mapped to Fast Activate 2, key = Tab. Docking Clearance (mandatory at all but Rock Hermits in my Ooniverse) is accessed via the Communications M.F.D. (OXZ). With the Communications M.F.D. active, use the n key to select the "Request Docking Clearance" option and then press b. All other keyboard commands are at their default settings." (Nite Owl)
Thrustmaster TM4
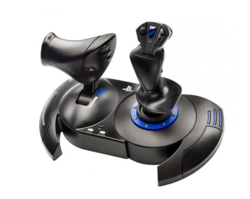
There are some 3 very similar Thrustmaster entry-level HOTAS (Hands on Throttle and Stick) sets: T.Flight 3, 4 & X. They seem mostly designed for those using gaming consoles as the buttons on each are quite limited in number.
They are very nicely designed - nice curves, screw holes at the bottom for attaching to something heavy like a desk (if so desired), an Allen key (living in a base recess) to separate the two halves of the throttle and joystick, a simple knob to stiffen up the joystick etc. Another point is that since the joystick and throttle are wired together, they only occupy one USB slot on the dreaded computer.
- The TM4 joystick has a 3-way axis for the stick (including the 3rd twist axis - disable-able with a screwdriver), a throttle axis on the left, and a fifth axis (rudder) on the back of the throttle stick.
- There are 13 buttons: 4 on the stick (including the trigger) and 6 on the throttle and 3 on the base of the throttle.
- The hat switch on the stick is a regular 4-way switch.
- The software for the TM3/4/X hotas is needed. It allows the PS button on the base of the throttle to toggle between vanilla PlayStation mode (where the empower the twist joystick z-axis and the throttle's rudder axis are disabled) and Joystick mode where everything works.
Cholly's settings: Cholly uses this HOTAS with an Elgato Streamdeck, so the confusing missile controls are there where they can be clearly labelled and understood. Cholly is quite new to Oolite, and has no other real experience of space sims.
- Axis 1 - (Joystick left/right): roll (left/right arrows) - Cholly read too many of Cody's old BB posts!
- Axis 2 - (Joystick left/right): pitch (up/down arrows)
- Axis 3 - (throttle): speed (w and s)
- Axis 4 - (twist on joystick): not used Cholly finds 3 axes on the same stick too confusing for words
- Axis 5 - possibly unbought pedals?
- Axis 6 - (rudder on throttle): yaw - (, & .)
- Button 1 - (trigger on joystick): fire laser (a)
- Button 2 - (L1 button): witchfuel injectors (i)
- Button 3 - (R3 button): roll/pitch Precision toggle (sort of ctrl but as a toggle)
- Button 4 - (L3 button): Toggle ID (r)
- Button 5 - (square on button): ECM (e)
- Button 6 - (x on button): Activate first fast equipment (defensive) (Tab)
- Button 7 - (circle on button): Activate second fast equipment (offensive) (0)
- Button 8 - (triangle on button): toggle weapons (shift-hyphen: _)
- Button 9 - (R2 button): zoom scanner (z)
- Button 10 - (L2 button): reset scanner (shift-z)
- Button 11 - (Share button): hyperspeed - Torus jump drive (j)
- Button 12 - (Options button): hyperdrive - Witchspace drive (h)
- Button 13 - (PS red/green LED button): not used (as disables rudder yawing)
- Hat Switch - (on joystick): used as 4 buttons - for the 4 views - (F1 - F4)
CH Combat Stick & Throttle Pro
. CH's stuff is rugged and is expected to last for decades. It is also light-weight and looks clunky! And big for the hands.
The CH Combat Stick has a two-axis joystick only (no twist) with fine-tuning thumbwheels which can eliminate drunkenness. There is the trigger, a pinky button (Joy_4) and 4 other buttons (Joy_5 is on the far side of the joystick, reached by the index finger). There are two hat-switches. There is a 3rd thumbwheel which can act as a throttle. The Pro Throttle has all the controls on the throttle itself - none on the base. There are 3 buttons behind the throttle handle and 5 hat-switches! The rightmost of these on the 'lozenge' on the side of the throttle is actually a mini-joystick which can be pressed and acts as a fourth button.
Cranky's settings: Cranky is new to Oolite, and favours the yaw take on astrogation.
- Joy Y axis - pitch
- Joy X axis - yaw
- Throttle - speed
- Mini-joystick - only x-axis - for roll only (y-axis and button not used)
- Top right hat-switch on Joystick - F1-F4 POV settings
- Bottom left hat switch on Joystick - combat settings: UP (ECM: e); DOWN (Activate 1st fast equipment defensive Tab); RIGHT (Activate *2nd fast equipment offensive 0); LEFT unset.
- Left-hand hat switch on throttle side - unset (too often fiddled with by accident).
- Top hat switch on throttle side - Special .oxp equipment: UP (Prime: shift-n); DOWN (Activate: n); LEFT (Modify: b)
- Bottom hat switch on throttle side - Docking: UP (Fast docking: shift-c); DOWN (Blue Danube docking: c); LEFT (request docking clearance: shift-l)
- Hat switch on back side of throttle - Scanner/Compass: UP (Scanner Zoom: z); DOWN (Unzoom: shift-z); LEFT (ASC next target: \)
- The right side settings of the throttle hat switches not used (waiting for reverse prime ctrl-shift-n & ASC last target | options to be added to the configuration pages).
- Joy_1 - (trigger) - fire laser (a)
- Joy_2 - toggle ID (r)
- Joy_3 - precison flying toggle (ctrl)
- Joy_4 - fire missile (m)
- Joy_5 - toggle weapons on/off (shift-hyphen or _)
- Joy_6 - unset missile (u) to neuter the ILS and the Automatic Targetting when they select an unwanted target
- 3 buttons on the back side of the throttle: drives!: Witchfuel injectors (i); Torus drive (j) & Witchspace drive (h)
Links
- Dizzy's guide to Setting up Joystick Axis Profiles
- Joysticks and Gamepads
- Joysticks: how to configure (BB thread basis for this page).
