Difference between revisions of "HDR"
| (5 intermediate revisions by the same user not shown) | |||
| Line 2: | Line 2: | ||
== Overview == | == Overview == | ||
| − | The current Windows Pre-releases/"nightlies" now support HDR. They can be downloaded from the very bottom of the [https://oolite.space/#download Downloads page] or directly from GitHub, [https://github.com/OoliteProject/oolite/releases here]. | + | The current Windows Pre-releases/"nightlies" now support HDR signal output. They can be downloaded from the very bottom of the [https://oolite.space/#download Downloads page] or directly from GitHub, [https://github.com/OoliteProject/oolite/releases here]. |
If you have a compatible monitor or TV you can now enjoy vivid, bright and high contrast colors that seem to pop right out of your screen, while maintaining full image details in both highlights and dark areas. Furthermore, colors in HDR mode are 10-bit per RGB component as opposed to 8-bit in SDR and can now exceed the standard Rec709 color space and go well into the DCI-P3 and BT2020 color spaces (see [https://www.benq.com/en-us/business/resource/trends/understanding-color-gamut.html?srsltid=AfmBOop1EleuJqvrAjiH9WEG7rcuOJmG54hUicbStmP8IQK9JSnicLJv here] for more), creating an even more impressive visual experience with 1.07 billion color hues available to you rather than the 16.7 million available in SDR. | If you have a compatible monitor or TV you can now enjoy vivid, bright and high contrast colors that seem to pop right out of your screen, while maintaining full image details in both highlights and dark areas. Furthermore, colors in HDR mode are 10-bit per RGB component as opposed to 8-bit in SDR and can now exceed the standard Rec709 color space and go well into the DCI-P3 and BT2020 color spaces (see [https://www.benq.com/en-us/business/resource/trends/understanding-color-gamut.html?srsltid=AfmBOop1EleuJqvrAjiH9WEG7rcuOJmG54hUicbStmP8IQK9JSnicLJv here] for more), creating an even more impressive visual experience with 1.07 billion color hues available to you rather than the 16.7 million available in SDR. | ||
| Line 44: | Line 44: | ||
( | ( | ||
400, 500, 600, 800, 1000 | 400, 500, 600, 800, 1000 | ||
| − | );</pre>and insert your new value in the row with the numbers, making sure it is separated by commas from the rest. Save and restart the game with Shift down to enable the edit and you should now have the extra option available. It is important that this value matches as closely as possible the actual max brightness your display can output | + | );</pre>and insert your new value in the row with the numbers, making sure it is separated by commas from the rest. Please note that <b>the values of 400 and 1000 nits are in-game limits</b> and <u>any value above or below those limits will either be ignored or result in unexpected behavior, depending on where in the array it is inserted</u>. Save and restart the game with Shift down to enable the edit and you should now have the extra option available. It is important that this value matches as closely as possible the actual max brightness your display can output. |
HDR Paper White indicates how bright a pure diffuse white object will be. You can think of it as a generic brightness slider. The higher you set it, the less headroom for highlights you leave. As a rule of thumb this can be set to about 1/4 of the max brightness, but it is entirely up to you to decide. You can set it to whatever feels comfortable to you. The range of this slider is from 80 to 280 nits. | HDR Paper White indicates how bright a pure diffuse white object will be. You can think of it as a generic brightness slider. The higher you set it, the less headroom for highlights you leave. As a rule of thumb this can be set to about 1/4 of the max brightness, but it is entirely up to you to decide. You can set it to whatever feels comfortable to you. The range of this slider is from 80 to 280 nits. | ||
| Line 52: | Line 52: | ||
== Choosing Your Preferred HDR Screenshot Format == | == Choosing Your Preferred HDR Screenshot Format == | ||
| − | The default HDR screenshot format is OpenEXR. It is chosen for its impressive accuracy and ability to display colors in all color spaces used for HDR displays (Rec709, DCI-P3 and BT2020). Be advised that .exr files | + | The default HDR screenshot format is OpenEXR. It is chosen for its impressive accuracy and ability to display colors in all color spaces used for HDR displays (Rec709, DCI-P3 and BT2020). Be advised that .exr files can be big though, depending on the image content. If you do not care that much about precise representation of what was on your screen at the time of capture and prefer having smaller size files that can maybe be easier to share online, you can switch the HDR snapshot output format to Radiance RGBE. To do that, make a backup of the file <code><OoliteInstallDir>\oolite.app\GNUstep\Defaults\.GNUstepDefaults</code>, then open it in a text editor and add: |
<pre>"hdr-snapshot-format" = .hdr;</pre> | <pre>"hdr-snapshot-format" = .hdr;</pre> | ||
The leading dot is optional, Oolite will understand the extension with or without it. If you enter any random string other than the allowed "[.]hdr" and "[.]exr", a warning will be posted in the log and .exr will be selected by default anyway. Save the file and that's it. | The leading dot is optional, Oolite will understand the extension with or without it. If you enter any random string other than the allowed "[.]hdr" and "[.]exr", a warning will be posted in the log and .exr will be selected by default anyway. Save the file and that's it. | ||
Latest revision as of 18:00, 23 September 2024
High Dynamic Range (advanced video display - currently only available for Windows platforms)
Contents
Overview
The current Windows Pre-releases/"nightlies" now support HDR signal output. They can be downloaded from the very bottom of the Downloads page or directly from GitHub, here.
If you have a compatible monitor or TV you can now enjoy vivid, bright and high contrast colors that seem to pop right out of your screen, while maintaining full image details in both highlights and dark areas. Furthermore, colors in HDR mode are 10-bit per RGB component as opposed to 8-bit in SDR and can now exceed the standard Rec709 color space and go well into the DCI-P3 and BT2020 color spaces (see here for more), creating an even more impressive visual experience with 1.07 billion color hues available to you rather than the 16.7 million available in SDR.
Fine gameplay moments in HDR can be captured in either OpenEXR (.exr) or Radiance RGBE (.hdr) format using the standard Oolite save snapshot key. You can view OpenEXR and Radiance RGBE files at a later time using software like Windows HDR+WCG Viewer (available from the Microsoft Store for free) or the also free and very powerful HDR image viewer utility, SKIV.
This has been implemented by our Developer, Another commander (who also greatly improved visuals in Oolite versions 1.86, 1.88 & 1.90).
Note
Because the changes only affect the display on a HDR screen, there is no way of displaying the improvements on an older SDR screen!
How to Enable Oolite's HDR Mode
After installing the game, a new shortcut will be added to the Start menu group for the game under Windows. Those who use the nightly installers will notice this new icon under the group "Oolite":
You can now use it to launch the game in HDR. Alternatively, you can launch Oolite from a console or the Windows Run dialog using
C:\path\to\game\oolite.app\oolite.exe -hdr
As a reminder, to be able to run the game in this mode you need:
- Windows 10 or 11 (11 is strongly recommended).
- A monitor that supports HDR output. An OLED monitor or TV is strongly recommended.
- Graphics card that supports HDR, like 10xx NVidia series or higher spec.
- HDMI 2.1 / DisplayPort 1.4 or higher spec cable, so that the HDR bandwidth requirement is satisfied.
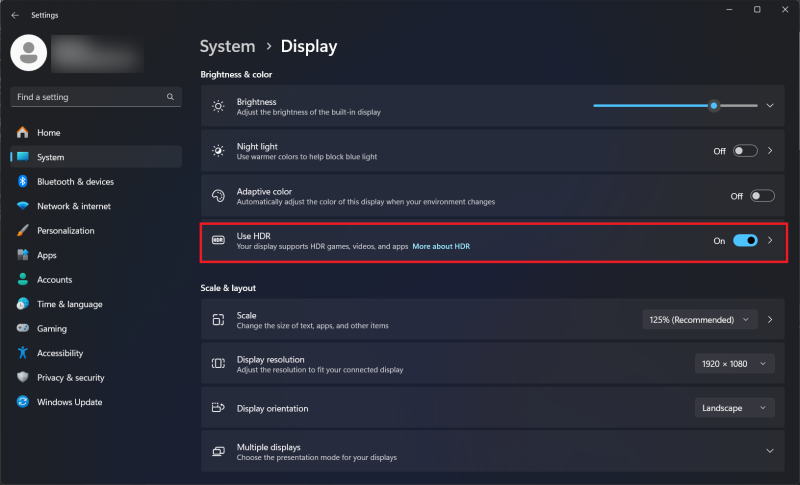
- Enabling of HDR in Windows from the Settings -> System -> Display. If your system does not support HDR for whatever reason you will not have the option to enable it.
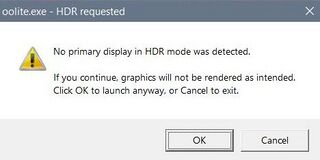
Attempting to launch the game in HDR mode without satisfying the above requirements will trigger a warning dialog informing the user that it was not possible to detect HDR on the system and asking whether the user would like to proceed with the game rendering as HDR in a non-suitable environment (i.e. looking weird) or abort.
Calibration
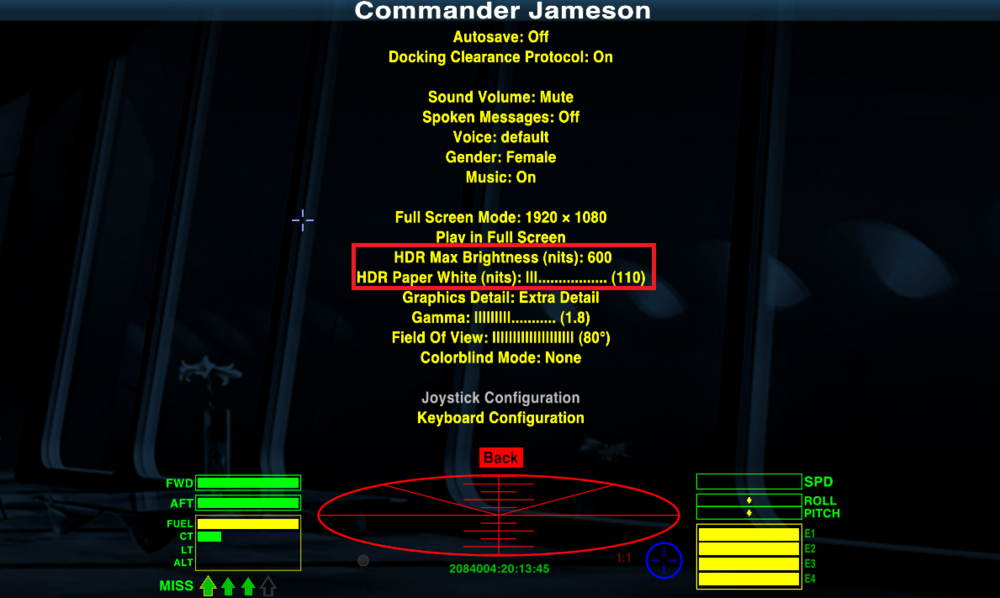
To obtain the most out of your HDR experience, you will have to calibrate the game to generate a display signal suitable for your monitor or TV. Oolite's Game Options menu is slightly different when the game is run in HDR mode, meaning that it has two options not normally appearing in the default menu: HDR Max Brightness and HDR Paper White. The menu in HDR mode will look as seen in the screen below:

By default HDR Max Brightness is set to 1000 nits (or cd/m2) and HDR Paper White is set to 200 nits. You must adjust those values to match your display. At this moment Oolite does not feature an HDR calibration screen so you should get the Max Brightness information for your display from either the manufacturer's website or by running the Windows HDR Calibration utility (available for Windows 11 at the Microsoft Store for free).
HDR Max Brightness can be set to 400, 500, 600, 800 and 1000 nits, but you can also edit descriptions.plist in your game install and add other values if you want - the game will accept them and use them. To add max brightness values, if so desired, open oolite.app/Resources/descriptions.plist in a text editor (backup the original file first just in case), find the block
hdr_maxBrightness_array =
	(
		400, 500, 600, 800, 1000
	);
and insert your new value in the row with the numbers, making sure it is separated by commas from the rest. Please note that the values of 400 and 1000 nits are in-game limits and any value above or below those limits will either be ignored or result in unexpected behavior, depending on where in the array it is inserted. Save and restart the game with Shift down to enable the edit and you should now have the extra option available. It is important that this value matches as closely as possible the actual max brightness your display can output.
HDR Paper White indicates how bright a pure diffuse white object will be. You can think of it as a generic brightness slider. The higher you set it, the less headroom for highlights you leave. As a rule of thumb this can be set to about 1/4 of the max brightness, but it is entirely up to you to decide. You can set it to whatever feels comfortable to you. The range of this slider is from 80 to 280 nits.
Once those are set to their correct / preferred values, you are ready for the HDR experience. The game is still playable even if you skip the calibration step, but the image might look off or clipped, so best if you don't skip it. Be advised that HDR has been designed for low lighting environments, so you should avoid brightly lit rooms when playing for best results.
Choosing Your Preferred HDR Screenshot Format
The default HDR screenshot format is OpenEXR. It is chosen for its impressive accuracy and ability to display colors in all color spaces used for HDR displays (Rec709, DCI-P3 and BT2020). Be advised that .exr files can be big though, depending on the image content. If you do not care that much about precise representation of what was on your screen at the time of capture and prefer having smaller size files that can maybe be easier to share online, you can switch the HDR snapshot output format to Radiance RGBE. To do that, make a backup of the file <OoliteInstallDir>\oolite.app\GNUstep\Defaults\.GNUstepDefaults, then open it in a text editor and add:
"hdr-snapshot-format" = .hdr;
The leading dot is optional, Oolite will understand the extension with or without it. If you enter any random string other than the allowed "[.]hdr" and "[.]exr", a warning will be posted in the log and .exr will be selected by default anyway. Save the file and that's it.
Links
- Oolite on HDR Displays (2022 - date) - this BB thread has the current information
- Windows 11 HDR Calibration App on Microsoft Support

