Dizzy's guide to Setting up Joystick Axis Profiles
Aka Splines, altering the response to joystick movements.
Contents
Introduction
For most Oolite players, the idea of editing Joystick Axis Profiles is likely to be a new one. Until you understand the concepts behind it, it can be quite confusing. This guide will hopefully get you up to speed with what is (to me) one of the most exciting new features of Oolite v1.80.
Background
Until now, joysticks in Oolite have behaved in a strictly linear fashion. The further you moved the stick, the faster your ship would roll, pitch or yaw, in direct proportion to the distance you moved the stick. The biggest problem this presented was that, much of the time, even small movements of the stick from the neutral centre position would produce ship movements that were too large for precision control. It was very difficult to accurately line up a shot on a distant target, as even tiny taps of the stick would move the sights from one side of the target to the other. Docking was difficult too, as inputting the correct amount of roll (a matter of only a few millimetres of stick movement) was largely a matter of luck.. if you were even a fraction of a millimetre out in either direction, ship roll would not match station roll, and you would either take massive damage, or die horribly.
To overcome this, "joystick precision mode" was quickly introduced. When enabled, this reduced stick sensitivity by a factor of three, so that to obtain the same degree of pitch, roll or yaw, you now had to move the stick three times as far. The upshot being that when precision mode was toggled on, much finer control was possible, as small movements of the stick would result in a movement of only 1/3 as much as in normal mode. Naturally, some skill was still required, but manual docking and long-range sniping were now practical possibilities, at least.
This was, however, a relatively primitive solution. Most good flight simulator games allow players to set up independent, non-linear "response curves" for each axis of their joystick. The primary intended use for this in "serious" flight simulators is to match the stick to the actual handling characteristics of a particular real-life aircraft, but naturally, it also allows a person to tweak things to what works best for them.
Thanks to the splendid efforts of Kanthoney, non-linear joystick response curves are finally available in Oolite 1.80.
Some definitions
- Movement - How far away from the neutral centre position the stick is moved.
- Response - The rate at which rotation or change of direction is applied to your ship. A low response means that the rate will change slowly, and a high response means that the rate will change rapidly.
- Linear response - This indicates that if you move the stick twice as far, it will have twice the effect on your ship's response rate.
- Non-linear response - This indicates that if you move the stick twice as far, the effect on the response rate of your ship will be less (or more) than twice as much, depending on just how you have things set up.
- Deadzone - This refers to the degree of offset from the neutral position that a stick must be moved through, before the ship responds.
- Range & Sensitivity - Two terms used to describe the settings in Oolite's Joystick Profile Editor. Each controls one of the two parameter values used in the mathematical formula which generates the "response curve". In this context, the terms themselves are relatively meaningless, except as a way of distinguishing one from the other.
- Response curve - What we get when we plot a joystick's Movement vs Response on a graph. It allows us to visualise how much Response we can expect for a given amount of Movement, on a given axis of the stick. As there are three different axes, a separate response curve needs to be plotted or set for each axis.
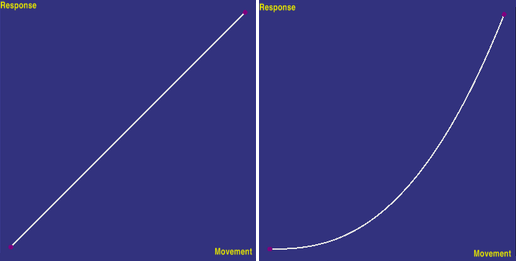
Here are a couple of examples to illustrate Response curves:
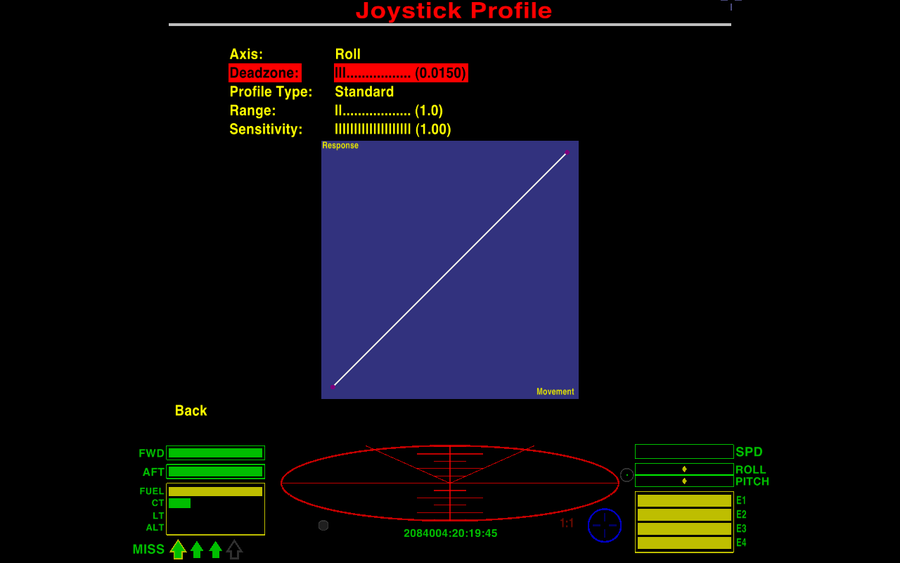
- The first image shows a Linear Response - as movement increases (from left to right on the horizontal axis), response increases in direct proportion (from bottom to top on the vertical axis). Therefore, in this instance, the "curve" is actually a straight line, or "linear".
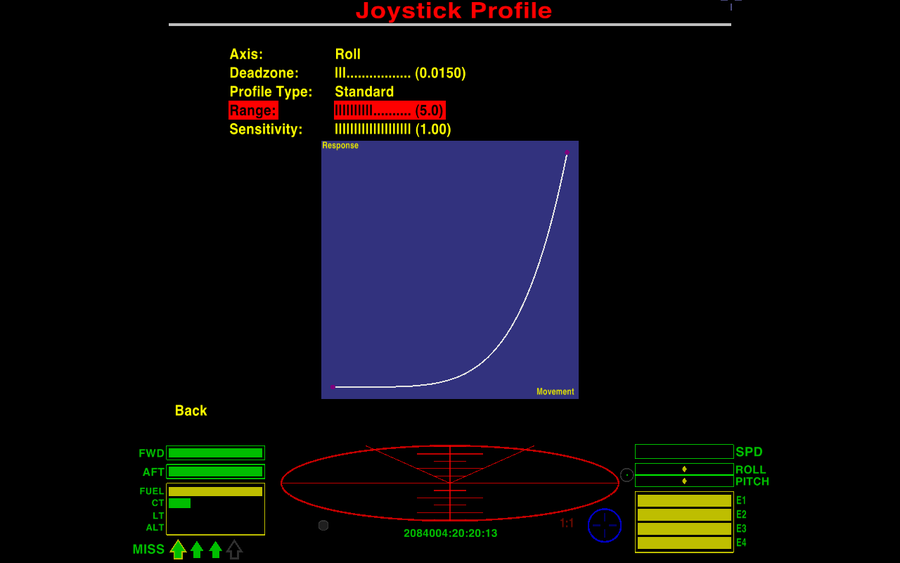
- The second image shows a Non-linear Response - as movement increases on the horizontal axis, response first changes by a small amount, then gradually changes by a larger amount, as more movement is applied.
Setting up your stick or controller
Now that you have some understanding of the concepts involved, it's time to get to get your stick tuned the way you want. This is best done whilst in-flight, so as to avoid a whole lot of launching and docking. Find a nice quiet region of space, where you won't be interrupted by NPC pirates, and press the <pause> key, followed by F2, then choose "Game Options", and finally, "Joystick Configuration". After each change, press the <pause> key again to un-pause Oolite and test out your changes. Repeat as required.
Here is a keymapping for playing with an Xbox One controller or a Logitech F310 which list the most important keys.
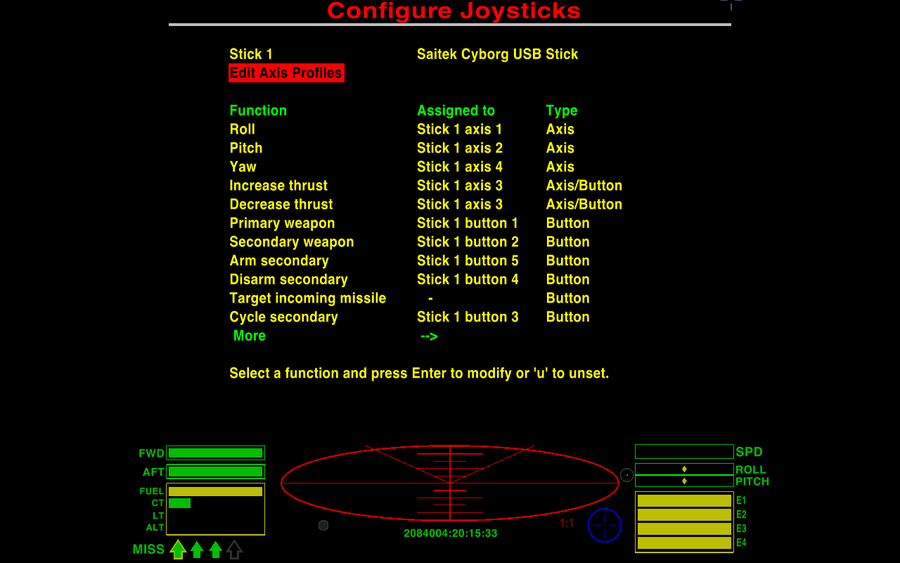
When you go to set up your stick, at the top you will see an option labelled "Edit Axis Profiles". Select it and press <Enter> (or double-click it with the mouse).
There are two different ways we can set up the response curves, the "standard" way, or by using what are called "splines". For the majority of players, the standard method is all they will require, so we'll cover that first. For those interested in learning about the more advanced technique of using splines, a good understanding of the standard method will make it easier to understand what is going on when we get to the section on splines.
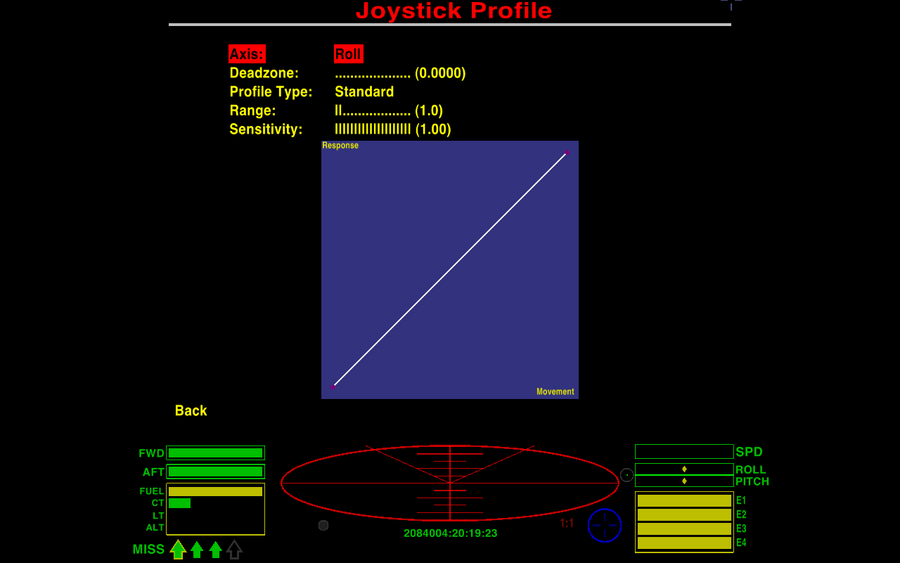
Below is the screen you'll see upon entering the Profile Editor. Use the up and down arrow keys to move to the different headings, and the left and right arrow keys to change the set values.
- "Axis" lets you choose whether you are editing the roll, pitch or yaw axis. So as to maximise versatility, each axis must be edited separately.
- "Deadzone" lets you compensate for a stick which doesn't quite properly return to neutral when you let go of the stick, resulting in, for example, a slight roll even when you let go of the stick (this is sometimes referred to as "drift"). This is a common problem with older sticks. The deadzone allows you to tell Oolite to ignore any input it receives from the stick, when the stick is in the neutral position. As some sticks are worse than others in this regard, the degree of deadzone you can set can be adjusted as needed. Just like response curves, deadzone is set individually for each axis. Note that a lot of deadzone may mean that you will have to move the stick some distance before any response is noticed.
- "Profile Type" is how you choose between standard or spline settings.
- "Range" and "Sensitivity" have already been discussed above in 'Definitions'. I will have a little more to say about them shortly.
- The vertical "Response" axis on the graph relates to how rapidly your ship will change its roll or direction. The bottom of the axis corresponds to zero rate of change, the top of the axis corresponds to the maximum rate of change.
- The horizontal "Movement" axis on the graph relates to how much you move the stick away from the centre neutral position. The left hand end of the axis corresponds to no movement from the neutral position, and the right hand end of the axis corresponds to maximum movement from the neutral position
First let's get the deadzone set up. On my own stick, I get a small amount of drift on all three axes, but it is especially a problem on the roll axis, where it has a distinct roll to the right. To compensate, I have dialled in a setting of 0.015, which ensures that my ship only rolls when I tell it to. Finding the correct setting requires some experimentation, but since it can be done whilst in-flight, it doesn't take long. You should only apply as much deadzone as necessary, so as to make sure your stick responds well when you move it.
Now we get to the fun stuff.. Below, you can see the setting I use for roll. As you can see, the response is minimal until stick movement is at around 30% of maximum. (You should note that, despite appearances, the response is not actually flat, which is to say zero, until 30% is reached. That is simply a limitation of the small area available to display the curve. Rest assured that in-game, you will notice the response to even very small movements of the stick.) Even at this relatively strong response curve setting, I don't actually need to move the stick very far to match Station roll when docking. However, if I apply only very gentle pressure to the stick, as opposed to actually moving it, I can produce roll rates so gentle that it takes a few seconds to notice that the ship actually is rolling. This is, in fact, much finer control than used to be possible using precision mode.
Once you have well set up response curves, you may find that you no longer need precision mode at all, either in combat or when docking. That allows you to use the button reserved for precision mode for other things, such as taking screenshots, for example.
This is the essence of response curves: The flatter the curve is at a particular point of the graph, the more gradual is the response to movement of the stick at that degree of movement. In other words, this gives very precise, fine control, akin to the old 'precision mode' in earlier versions of Oolite. A steeply rising curve, on the other hand, means that a small amount of movement of the stick will result in a large response, and precision control will not be possible.
At this point, some comment on the difference between "Range" and "Sensitivity" is probably in order. It is far easier to see the differences for yourself than to explain them. To illustrate how they work, try dialling in a mid-range value into the range parameter, then look at the bottom left while varying sensitivity. Notice the gradient there changes as you do, so "sensitivity" affects the sensitivity at the origin. Now vary the range with a mid-range sensitivity locked in. Notice that the gradient at the origin stays the same, but the "knee" in the curve moves in and out - the higher the range, the further out the knee.
However,, when trying to set a curve, I suggest that you ignore the names and numerical values of the settings, and instead, focus on trying to produce a curve of the shape that best approximates the behaviour you want on that axis. The names and numbers are most useful as a way to return to a known setting when experimenting. Although my examples only show one setting, "Range", being changed from the default value, I suggest you experiment with both, to get a feel for how they affect the curve, and how they interact with one another.
Finding what works best for you, will once again require some experimentation. It depends to some extent on your stick, on the handling characteristics of the ship you're flying, and on your own personal preferences. The ship I mostly fly is a Pitviper, which is a very responsive ship, one might almost say 'twitchy'.. and so the roll setting I use helps to tame that behaviour, while still allowing it to respond very rapidly when I want it to.
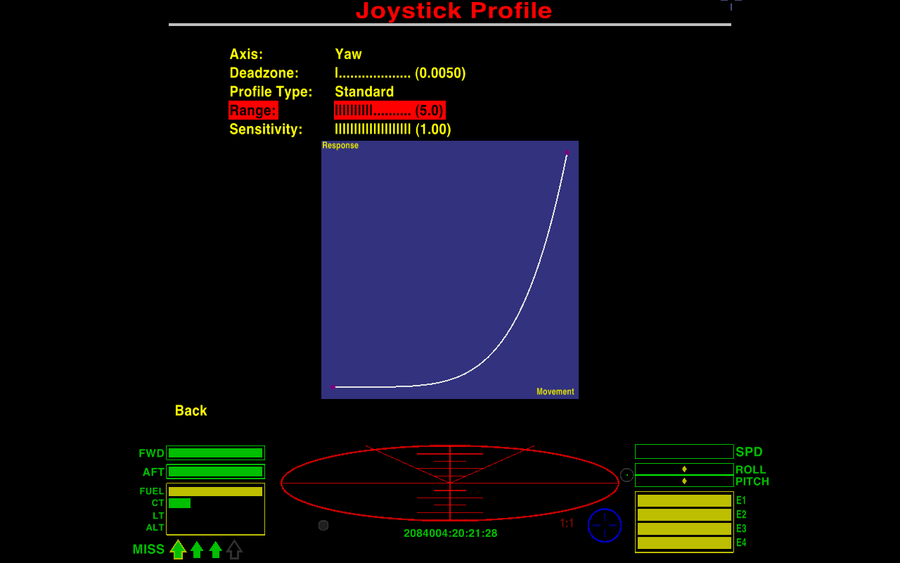
Pitch and Yaw are set up in exactly the same way, but it is worth noting that a less extreme setting is usually ok for pitch, whereas most ships are very sensitive to yaw, so that a higher setting helps make accuracy with small amounts of movement easier to achieve. Your own preferences in this respect may well differ, of course. You can also see that I only required a minimal deadzone setting on these two axes, in order to make my stick behave properly.
The above is all that is necessary to set up a good joystick profile, and most people will not want or need to go beyond the "standard" method of setting up a profile. But for the adventurous, the curious, and those that just can't quite get the curve to look the way they want, there is another method of achieving the same thing. It is far more versatile than the standard method, and allows you to create some truly strange response curves, if you wish to do so.
Spline response curves
Now we come to the really weird part of the whole profiling business.
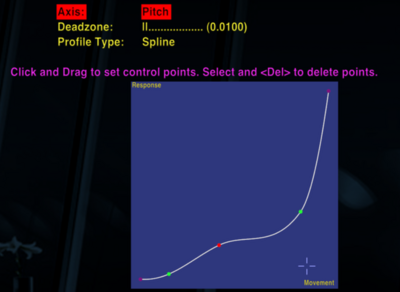
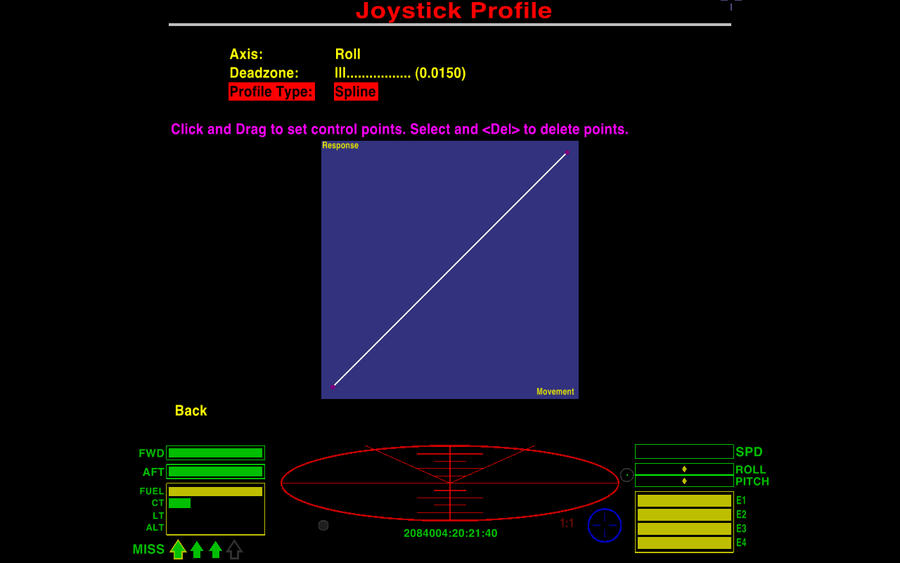
If you change an Axis Profile Type to Spline (and you can do this to just one, two, or all three of the axes), this is what you'll see on the screen:
Do as the instructions suggest, and click on the white line, or anywhere else on the graph, for that matter. A control-point, or "node" will appear, which you can drag around the screen to any point you like. You can also slide nodes along the line, to position them wherever you want on the curve itself. Here is a spline curve with one node.
And here is one with a pair of nodes. Just try getting that curve with the standard method!
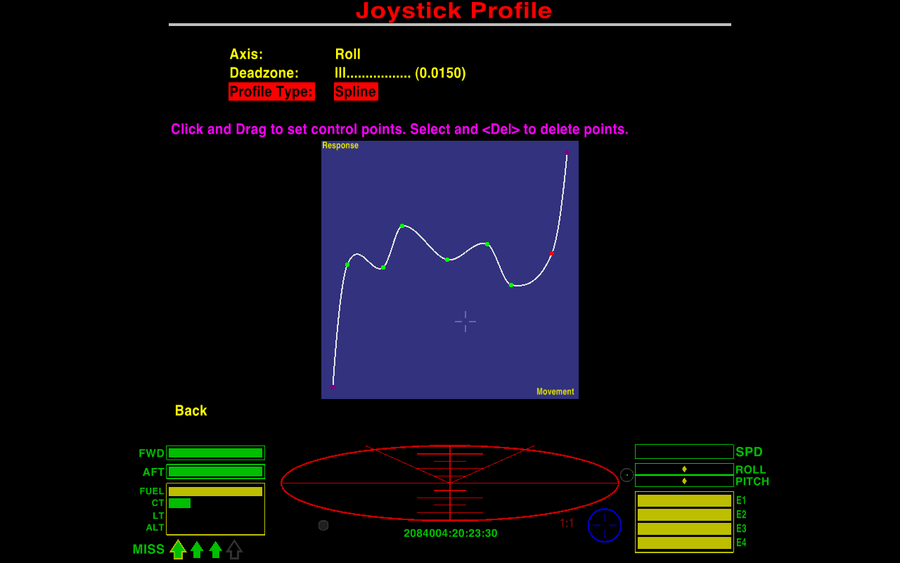
In fact, you could really go nuts... this one has areas where responsiveness actually decreases as more movement is applied, and "flat spots" where movement would have little to no effect! If you have a friend who insists they're a better pilot than you, you could surreptitiously set up a profile like this on your stick and challenge them to try playing on your machine. Or mess with the stick settings on their own copy of Oolite.. <evil grin>
Fortunately, nodes are as easy to get rid of as they are to create. Just click on a node to select it, and press the <Delete> key to delete the node. Here we have a curve that, whilst unusual, is at least somewhat more practical than the roller-coaster track in the last picture. Test your new-found knowledge by trying to predict how a stick with a curve like this next one would respond in-flight.
If you said something to the effect that "The stick would have very fine control with a small amount of movement from centre, then responsiveness would increase as movement from centre passed 25%, up until around 40% movement, where responsiveness would again decrease, giving fine, precise control once more, then a 'flat spot' between 50% and 60%, after which responsiveness again increases as stick movement passes 70%, and responsiveness being very high from 80% onwards", then congratulations, you fully understand how to read a response curve!
The above example may not be really practical in-game, but you can see that if you want more control over a response curve, splines are the way to go. For instance, even the following rather basic "knee" in the curve can't be obtained with the standard method. This might be a useful curve for someone such as a small child with poor motor-control skills, for example. The response is quite gentle up until almost full stick movement is reached.
And that's about all there is to it.
Have fun experimenting with your joystick profiles, and finding something that works for you!
Dizzy
Links
- Nonlinear joystick (2014) - some discussion about the above...
- Cody's January 2021 nodes are here
- Joysticks: Guide to Setting Up - non-profiling matters
