Difference between revisions of "Short Range Chart"
From Elite Wiki
m (tweak) |
|||
| Line 1: | Line 1: | ||
==Display== | ==Display== | ||
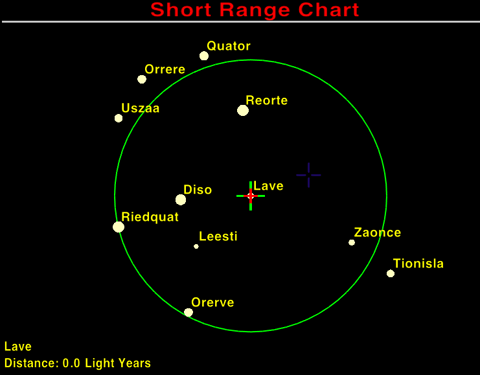
| − | Calling upon the '''Short Range Chart''' will show the systems that are within or near hyperjump | + | Calling upon the '''Short Range Chart''' will show the systems that are within, or near hyperjump distance. The circle marks the actual hyperjump range given the available fuel. |
| Line 6: | Line 6: | ||
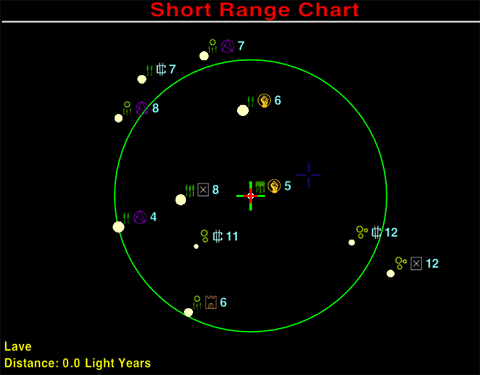
| − | *Upon pressing <font size="3">'''i'''</font>, the QuickInfo feature is activated, | + | *Upon pressing <font size="3">'''i'''</font>, the QuickInfo feature is activated, exposing the basic facts of the visible systems. |
| Line 12: | Line 12: | ||
| − | The displayed icons signify the '''Economy''' and the '''Government''' | + | The displayed icons signify the '''Economy''' and the '''Government''', and the number denotes the '''Tech Level'''. |
==Icon legend== | ==Icon legend== | ||
===Economy=== | ===Economy=== | ||
{| cellspacing="3" align="left" border="0" text-align="center" | {| cellspacing="3" align="left" border="0" text-align="center" | ||
| − | |align="center" width="160" height="70"|Poor Agricultural<br>[[Image:Oolite-gov-pooragri.png| | + | |align="center" width="160" height="70"|Poor Agricultural<br>[[Image:Oolite-gov-pooragri.png|50px]] |
| − | |align="center" width="160" height="70"|Average Agricultural<br>[[Image:Oolite-gov-aveagri.png| | + | |align="center" width="160" height="70"|Average Agricultural<br>[[Image:Oolite-gov-aveagri.png|50px]] |
| − | |align="center" width="160" height="70"|Rich Agricultural<br>[[Image:Oolite-gov-richagri.png| | + | |align="center" width="160" height="70"|Rich Agricultural<br>[[Image:Oolite-gov-richagri.png|50px]] |
| − | |align="center" width="160" height="70"|Mainly Agricultural<br>[[Image:Oolite-gov-mainagri.png| | + | |align="center" width="160" height="70"|Mainly Agricultural<br>[[Image:Oolite-gov-mainagri.png|50px]] |
|- | |- | ||
| − | |align="center" width="160" height="70"|Poor Industrial<br>[[Image:Oolite-gov-poorindu.png| | + | |align="center" width="160" height="70"|Poor Industrial<br>[[Image:Oolite-gov-poorindu.png|50px]] |
| − | |align="center" width="160" height="70"|Average Industrial<br>[[Image:Oolite-gov-aveindu.png| | + | |align="center" width="160" height="70"|Average Industrial<br>[[Image:Oolite-gov-aveindu.png|50px]] |
| − | |align="center" width="160" height="70"|Rich Industrial<br>[[Image:Oolite-gov-richindu.png| | + | |align="center" width="160" height="70"|Rich Industrial<br>[[Image:Oolite-gov-richindu.png|50px]] |
| − | |align="center" width="160" height="70"|Mainly Industrial<br>[[Image:Oolite-gov-mainindu.png| | + | |align="center" width="160" height="70"|Mainly Industrial<br>[[Image:Oolite-gov-mainindu.png|50px]] |
|- | |- | ||
|align="center" width="160" height="30"| <br> | |align="center" width="160" height="30"| <br> | ||
| Line 31: | Line 31: | ||
===Government=== | ===Government=== | ||
{| cellspacing="3" align="left" border="0" text-align="center" | {| cellspacing="3" align="left" border="0" text-align="center" | ||
| − | |align="center" width="160" height="70"|Anarchy<br>[[Image:Oolite-gov-anarchy.png| | + | |align="center" width="160" height="70"|Anarchy<br>[[Image:Oolite-gov-anarchy.png|40px]] |
| − | |align="center" width="160" height="70"|Feudal<br>[[Image:Oolite-gov-feudal.png| | + | |align="center" width="160" height="70"|Feudal<br>[[Image:Oolite-gov-feudal.png|40px]] |
| − | |align="center" width="160" height="70"|Multi-Government<br>[[Image:Oolite-gov-multigov.png| | + | |align="center" width="160" height="70"|Multi-Government<br>[[Image:Oolite-gov-multigov.png|40px]] |
| − | |align="center" width="160" height="70"|Dictatorship<br>[[Image:Oolite-gov-dictatorship.png| | + | |align="center" width="160" height="70"|Dictatorship<br>[[Image:Oolite-gov-dictatorship.png|40px]] |
|- | |- | ||
| − | |align="center" width="160" height="70"|Communist<br>[[Image:Oolite-gov-communist.png| | + | |align="center" width="160" height="70"|Communist<br>[[Image:Oolite-gov-communist.png|40px]] |
| − | |align="center" width="160" height="70"|Confederacy<br>[[Image:Oolite-gov-confederacy.png| | + | |align="center" width="160" height="70"|Confederacy<br>[[Image:Oolite-gov-confederacy.png|40px]] |
| − | |align="center" width="160" height="70"|Democracy<br>[[Image:Oolite-gov-democracy.png| | + | |align="center" width="160" height="70"|Democracy<br>[[Image:Oolite-gov-democracy.png|40px]] |
| − | |align="center" width="160" height="70"|Corporate State<br>[[Image:Oolite-gov-corpstate.png| | + | |align="center" width="160" height="70"|Corporate State<br>[[Image:Oolite-gov-corpstate.png|40px]] |
|} | |} | ||
[[Category:Oolite]] | [[Category:Oolite]] | ||
Revision as of 14:34, 22 February 2006
Contents
Display
Calling upon the Short Range Chart will show the systems that are within, or near hyperjump distance. The circle marks the actual hyperjump range given the available fuel.
- Upon pressing i, the QuickInfo feature is activated, exposing the basic facts of the visible systems.
The displayed icons signify the Economy and the Government, and the number denotes the Tech Level.
Icon legend
Economy
Poor Agricultural
|
Average Agricultural
|
Rich Agricultural
|
Mainly Agricultural
|
Poor Industrial
|
Average Industrial
|
Rich Industrial
|
Mainly Industrial
|
Government
| Anarchy |
Feudal |
Multi-Government |
Dictatorship |
| Communist |
Confederacy |
Democracy |
Corporate State |

